Basics
Focus & Modes
Settings
Tips & Tools
Advanced
Troubleshooting
Gear & Menu
Welcome to Your Z9 Guide
This guide will help you master your Z9 for photography. From initial setup to advanced techniques, it's packed with practical, experience-based information — not just a rehash of the manual.
It's not a user manual — we already have one of those. It's more of a... these are the buttons you need to know and this is how you get the very best out of the Z9.
Created by Kieran Hayes, a professional photographer from West Cork, Ireland, and proud Z series shooter working across multiple photography genres.
With over 12 years of experience as a photography educator for leading brands and running photography workshops, this guide represents years of experience keeping things simple and taking away the unnecessary complications of modern cameras.
No app is perfect, so if there's anything missing that you feel is important and want explained, please let me know. I'll be updating this app regularly with help from your feedback.
What's Inside
📷 Complete AutoFocus Setup
Master all AF modes, area modes, subject detection, and advanced focus techniques for the Z9
💾 Memory Card Configuration
Both slots take CFexpress Type B — optimal card choices and configuration for every workflow
📊 Tips & Tools
Quick reference for every shooting scenario — portrait, landscape, wildlife, sports, low light. Includes the ND Filter Calculator, Golden Hour & Blue Hour Calculator, and Depth of Field Calculator
🔧 Essential Settings
The settings to change immediately out of the box for better results with your Z9 — Auto ISO, Back Button Focus, Histogram & Exposure and more
⚡ Advanced Features
🛠️ Troubleshooting
30 common Z9 issues with step-by-step fixes — from RAW greyed out to banding under lights to focus hunting
App Features
- 📱 Works offline — no internet required
- 🔍 Searchable content database — find any setting instantly
- 🎯 Interactive camera button reference (all 37 Z9 buttons)
- 📋 Cheat sheets for portrait, landscape, wildlife, sports & low light
- 🧮 ND Filter Long Exposure Calculator — convert base exposure through any ND filter
- 🌅 Golden Hour & Blue Hour Calculator — satellite map with sunrise/sunset direction lines
- 📐 Depth of Field & Hyperfocal Distance Calculator — calibrated for the Z9's 45.7MP sensor
- ⚡ Kieran's Boosted Subject Detection — custom AF system for every shooting genre
📣 Join the Community
Join the Facebook group for Z9 users and app users — a great place to share feedback, tips, and connect with other Z9 shooters.
Share your experience, report issues, and help shape future updates.
Affiliate Disclosure
This guide contains affiliate links to products I personally use and recommend. When you purchase through these links, I may earn a small commission at no additional cost to you. This helps support the creation of free content and guides like this one.
I only recommend products I genuinely believe in and use myself. Your trust is important to me, and I would never recommend something solely for commission. All opinions are my own based on real-world experience.
Thank you for supporting my work! 📸
Getting Started with Your Z9
The Z9 is a professional flagship camera. This guide gets you up and running quickly by focusing on what actually matters — the controls, settings and workflows that make a real difference.
First Steps After Unboxing
Battery Charging
The Z9 uses the EN-EL18d battery — a high-capacity battery that delivers approximately 2,100 shots per charge (CIPA rating). This is vastly more than most mirrorless cameras.
Use the supplied MH-33 charger to fully charge the battery before first use. A full charge takes approximately 2.5 hours.
Charging Options
The Z9 supports USB-C charging via the USB-PD port — great for topping up during travel or on location. However, use the dedicated MH-33 charger for regular charging to avoid heat buildup. The Z9 can also be powered continuously via USB while shooting — useful for studio work.
💡 Battery Life Advantage
The Z9's EN-EL18d battery is dramatically more capable than the EN-EL15c used in the Z8. You can typically shoot a full wedding or sports event on a single charge. Always carry a spare EN-EL18d for critical shoots.
Memory Cards
The Z9 has dual CFexpress Type B / XQD card slots. Both slots are identical — there is no SD card slot on the Z9. This is a key difference from the Z8.
For best performance in 8K video, 4K 120p, or high-speed continuous bursts, use fast CFexpress Type B cards in both slots.
Recommended CFexpress Type B Cards
Delkin Black is a top choice for Z9 shooters. ProGrade Gold (Gen 4.0) and Pergear cards also perform excellently for 8K RAW and 120fps bursts. For very high-speed work, higher-capacity cards (512GB, 1TB) often have better sustained write speeds.
Setting Primary Slot
CRITICAL Set Slot 1 as Primary
Menu → Camera Icon → Photo Shooting Menu → Primary Slot Selection → CFexpress/XQD Card Slot 1
Designate Slot 1 as your primary card slot. Both are equally fast, but nominating one keeps your workflow consistent.
Secondary Card Behaviour
Overflow
Slot 2 only used when Slot 1 is full. Best for maximum speed — full write performance of Slot 1.
Backup
Both cards record the same image simultaneously. Essential for commercial, wedding, and sports shoots where no image can be lost.
RAW / JPEG Split
RAW on Slot 1, JPEG on Slot 2. Great for wildlife and sports — RAW for editing, JPEG immediately shareable.
JPEG / JPEG
JPEG on both cards. Helpful for event shoots where file management speed matters more than RAW editing flexibility.
Format Your Memory Cards
Menu → Setup Menu (wrench icon) → Format Memory Card
Always format cards inside the camera, never on a computer. This ensures the card filesystem is correctly set up for your Z9. Format each slot separately.
Attaching a Lens
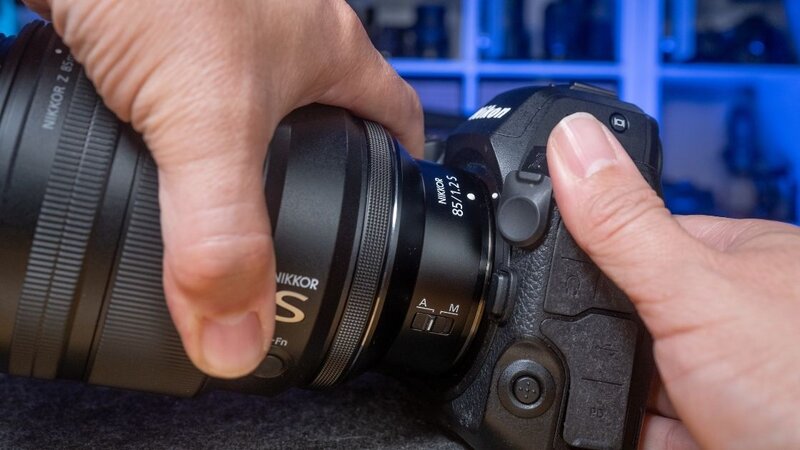
- Always attach and detach lenses with the camera powered off
- Align the white dot on the lens with the white dot on the camera body (Z mount)
- Rotate counterclockwise until it clicks into place — listen for the click!
- The Z9 accepts all Nikon Z mount lenses natively, and F-mount lenses via the FTZ II adapter
Z9 Sensor Shield
The Z9 has a built-in sensor shield that drops down when the camera is powered off to protect the sensor from dust. Enable this in: Menu → Setup Menu → Sensor Shield Behaviour At Power Off → Sensor Shield Closes.
Firmware Updates
The Z9 has received major free firmware updates from Nikon that have added significant features including 8K 60p video, improved subject detection, and burst enhancements. Always keep your Z9 up to date.
Check Current Firmware
Menu → Setup Menu (wrench icon) → Firmware Version
Check your current version. Visit downloadcenter.nikonimglib.com to see if an update is available.
How to Update
- Download the firmware .bin file from downloadcenter.nikonimglib.com
- Format a CFexpress card in camera, then copy the .bin file to the root of the card on your computer
- Insert the card, go to Menu → Setup Menu → Firmware Version
- The camera detects the file — select Update and follow on-screen instructions
- Do NOT power off or remove the battery during the update
⚠️ Safe Update Tips
Always update with a fully charged EN-EL18d battery. Back up your camera settings to a card before updating (see Advanced section). Major Z9 firmware updates can reset some settings.
Language, Date & Time
Set Language
Menu → Setup Menu (wrench icon) → Language
Set Date & Time
Menu → Setup Menu (wrench icon) → Time Zone and Date
Set your timezone, date format, and current time. This timestamps every photo you take — important for sorting and cataloguing.
Sync Time via GPS
Menu → Setup Menu → Location Data → Position / Sync Clock from Satellite
The Z9's built-in GPS can automatically sync the clock via satellite — extremely accurate. Enable this and your timestamps are always correct.
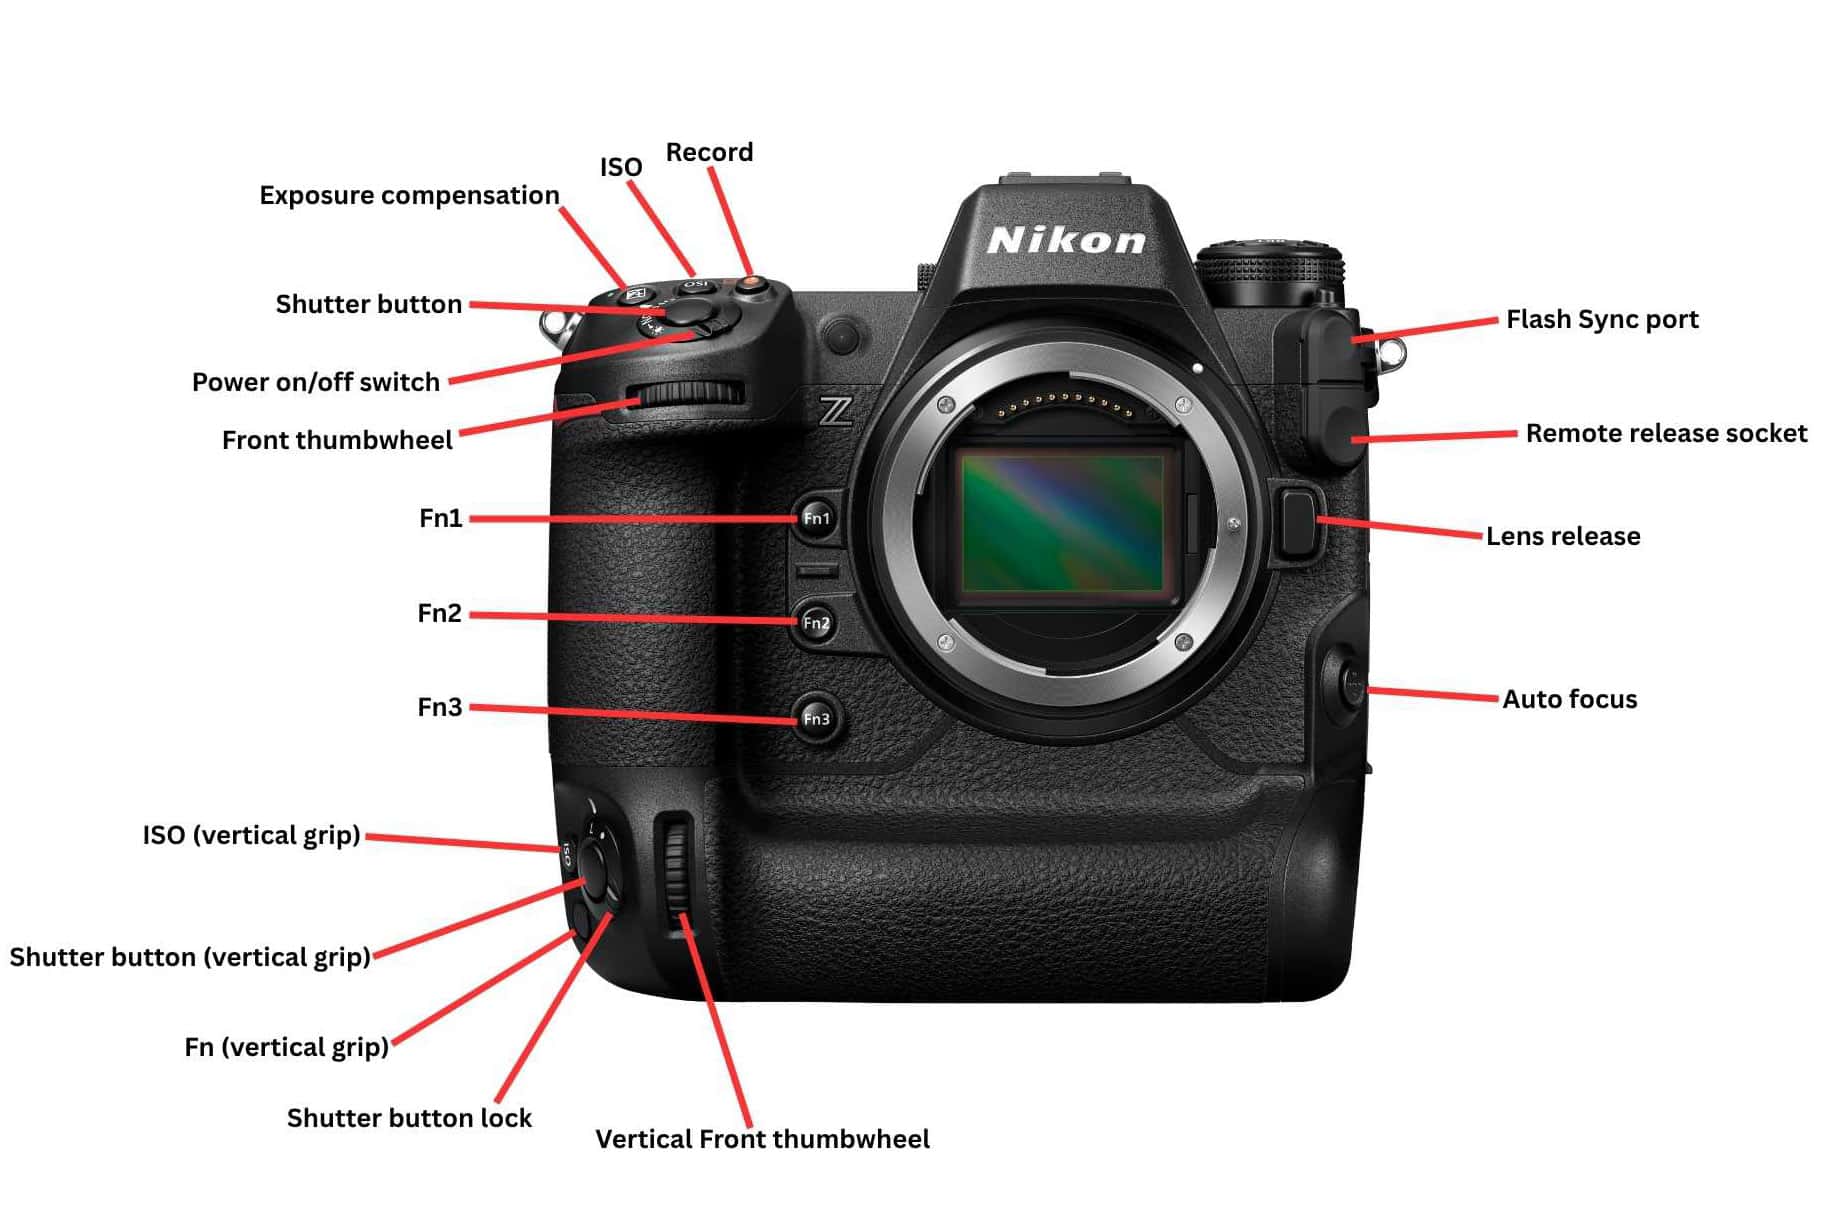
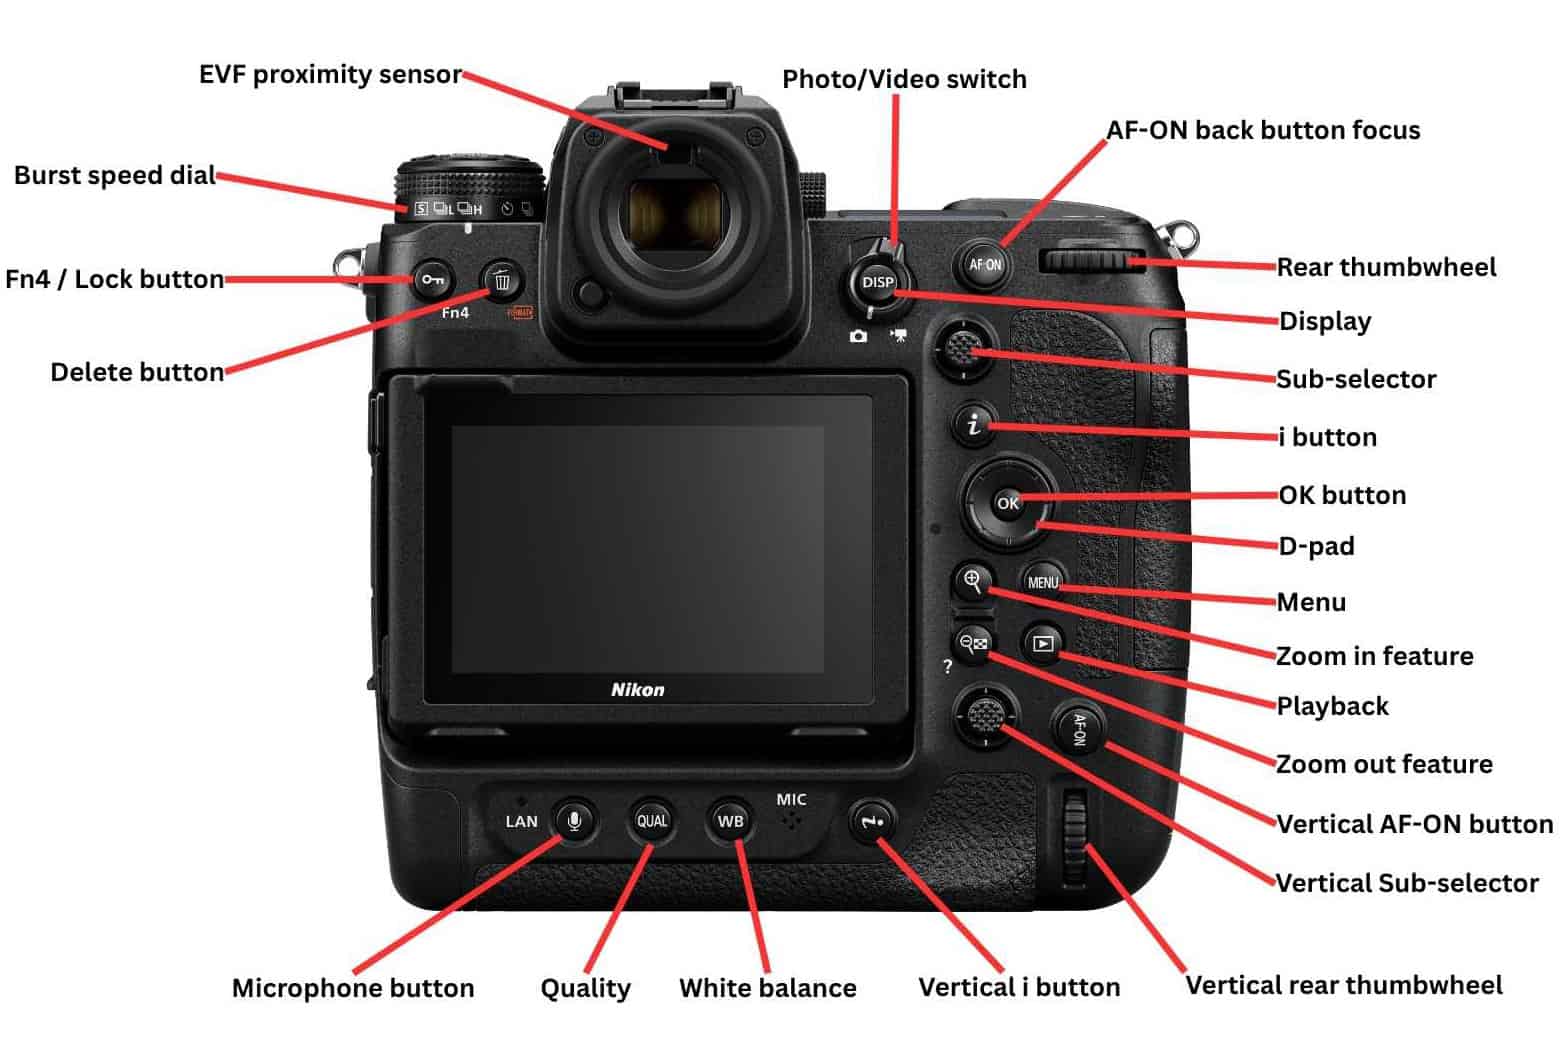
Camera Button Layout
Visual reference for all Z9 buttons and controls. Tap images to enlarge.
💡 Interactive Button Reference
Click any button below to see its exact location on the camera diagram
📸 Front View
📸 Back View
📸 Top View
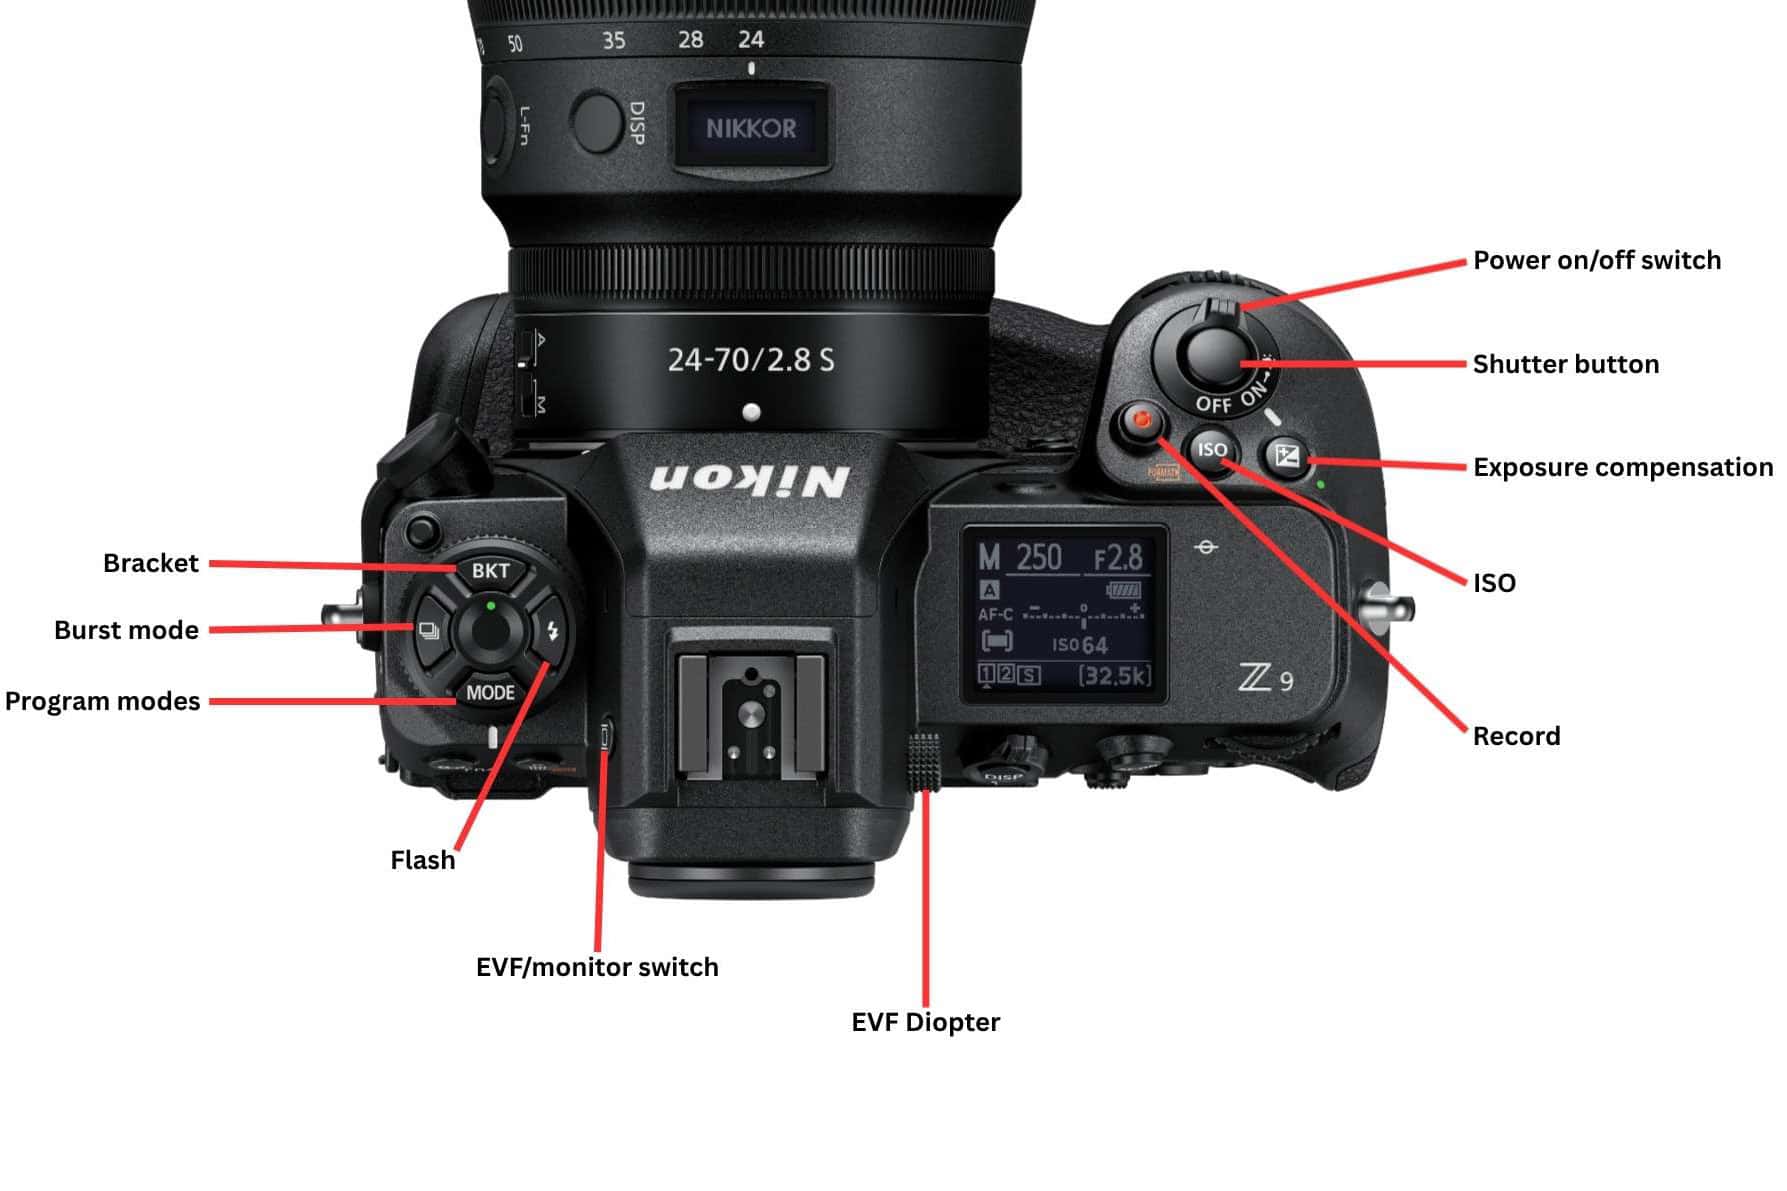
Button Reference — All 37 Buttons
Tap any button to learn its function and location:
Program Modes (P, S, A, M)
P — Program Auto
Camera chooses both shutter speed and aperture. You can shift the combination using the command dial. Good starting point for unfamiliar lighting situations.
S — Shutter Priority
You set the shutter speed; camera sets the aperture. Use when freezing motion is the priority — sports, wildlife, children. Combine with Auto ISO.
A — Aperture Priority
You set the aperture; camera sets the shutter speed. Most photographers' default mode. Controls depth of field — wide aperture = blurred background (portraits), narrow = sharp throughout (landscapes).
M — Manual
Full manual control. You set both shutter and aperture. Combine with Auto ISO for a powerful hybrid mode — manual creative control, automatic exposure. Perfect for consistent results under controlled lighting.
💡 M + Auto ISO — Best of Both Worlds
Set your Z9 to Manual mode with Auto ISO enabled. You control creative decisions (aperture and shutter speed) while the camera handles exposure automatically. This is the go-to mode for professional event, wedding, and sports photographers.
AutoFocus on the Z9
The Z9's AF system is exceptional. With 493 focus points covering nearly the full frame, EXPEED 7 processing, and focus acquisition down to -9EV, it can focus in near-total darkness and track subjects through extreme situations.
Focus Modes Explained
Focus modes control how your camera performs focusing. The Z9 has four options: AF-S, AF-C, MF and AF-F (video only).
AF-S (Single)
Standard single-time focus. When the shutter button or AF-ON are pressed, the camera locks focus. If the subject moves, you need to release and refocus again. This was the default for most photographers as it gives less focus hunting in low light and confirms a lock before firing.
AF-C (Continuous) ⭐ Recommended
When you press the focus button, the camera keeps focusing continuously. This is incredibly handy for moving subjects — the focus now tracks the subject as it moves. With modern cameras like the Z9 and fast lenses, AF-C is now the preferred mode for most shooting situations. I use it for wildlife, portraits and sports.
MF (Manual)
The camera won't autofocus when you press the shutter or AF-ON button. You focus manually using the lens focus ring. Ideal for landscape photography and product work where you need precise control. When paired with Focus Peaking, you can achieve absolutely perfect focus on your desired subject.
AF-F (Follow)
Only used in video mode — doesn't apply to still photography.
💡 Use AF-C as Your Default
The Z9's AF-C is so good that many professional photographers use it as their default mode even for stationary subjects. The camera is smart enough to hold focus when your subject is still and track when they move — giving you the best of both worlds without switching modes.
How to Change Focus Mode
Use the Focus Mode Selector Lever on the back-left of the camera body. Three positions: AF-S, AF-C, MF. No menu required. Alternatively, hold the Focus Mode button and rotate the rear command dial.
AF-Area Modes
AF-area modes tell the camera where in the frame to focus — how much of the frame to search.
Auto-Area AF
Covers all 493 focus points (90% of the frame) — the camera decides what to focus on. It's not the most precise as it can get confused by multiple subjects and focus on the wrong one. However it's very powerful when combined with Subject Detection, as the detection algorithm guides it to the right target.
Wide-Area AF (S) / Wide-Area AF (L) ⭐ My Choice
Restricts the AF to a smaller rectangular zone you can place anywhere in the frame. Also works with subject detection. Wide Area (L) is my default focus mode — it's large enough for subject movement but small enough to avoid confusing the camera with too many focusing options. This is an essential part of my Boosted Subject Detection system.
Wide Area C1 / C2 (Custom Size)
Works the same as Wide Area modes above but you can set a custom box size via the menu: Photo Shooting Menu → AF Area Mode → Wide-Area AF C1 → press right arrow to resize. This gives you precisely the right size focus area for your shooting style.
Dynamic-Area AF (S, M, L)
A primary focus point you set, surrounded by helper points that take over if your subject briefly leaves the primary point. What's different here is that if your subject moves off that primary point but stays within the dynamic box, the Z9 continues to focus on it. It's like a mix of single-point focus and 3D tracking in one mode.
3D Tracking ⭐ My Choice
Once locked onto your subject the Z9 follows it around the entire frame and keeps it perfectly in focus. Excellent for fast-moving sports, birds in flight, and erratic movement. The key is getting the Z9 to lock onto your subject in the first place — this is a central part of my Boosted Subject Detection system in the Advanced section.
Single Point ⭐ My Choice
One focus point you move with the joystick or multi-selector. Great for extra precise focusing — perfect focus on a specific point. I use it a lot for product photography, macro work, and landscapes where I need full control over where focus falls.
Pinpoint
Even smaller than Single Point — the most precise focus area available. Only available in AF-S mode. Use for critical macro work, product photography, or any situation where you need to place focus on an exact pixel.
💡 How to Change AF-Area Mode
Hold the AF Area Mode button on the back of the camera and rotate the front command dial to cycle through area modes. The current mode is shown in the viewfinder and on the rear display.
Subject Detection
Subject Detection is one of the Z9's most powerful autofocus features. When enabled, the camera automatically identifies and tracks a specific type of subject in the frame — locking focus on it and following it even as it moves. Combined with AF-C and your chosen AF Area mode, it's an absolute game changer.
⚙️ How to Enable Subject Detection
Menu → Photo Shooting Menu (camera icon) → AF Subject Detection Options → Select your mode
Subject Detection Modes
Auto
The camera automatically decides which subject type to prioritise based on what it detects in the frame. It cycles through people, animals, birds and vehicles intelligently. This is a great all-round setting if you're shooting a mixed scene or switching quickly between subjects. The Z9 is remarkably good at making the right call in Auto mode.
People
Optimised for detecting and tracking people. When a person is detected, the camera prioritises their face and eyes — locking onto the nearest eye and keeping it sharp even as your subject moves. This is the go-to mode for portraits, events, weddings and street photography. Eye detection in this mode is incredibly accurate and reliable on the Z9.
Animal
Designed for pets and animals. The Z9 attempts to detect the animal's face and eyes and will prioritise those when tracking. Works brilliantly for dogs, cats and other domestic animals. For wildlife where the animal may be partially obscured or at a distance, the camera falls back to tracking the animal's body if the face isn't visible.
Bird
A dedicated mode specifically tuned for bird detection and tracking. Birds in flight are notoriously difficult to track due to their speed, erratic movement and small size — this mode is optimised to handle exactly that. The Z9 will detect the bird's eye when close enough and track the body when further away or in flight. Essential for bird and wildlife photographers.
Vehicles
Optimised for tracking cars, motorcycles, trains and other motorised vehicles. The camera locks onto the main body of the vehicle and tracks it as it moves across the frame. Perfect for motorsport, car photography, and any fast-moving vehicle work. Combined with AF-C and a fast shutter speed this is an incredibly powerful setup for action photography.
Airplanes
Dedicated tracking for aircraft — planes, helicopters, and similar subjects. Airplanes present a unique challenge as they can move across the entire frame very quickly and at varying distances. This mode is tuned to detect and lock onto aircraft shapes and keep them sharp even at high speed. Great for airshows and aviation photography.
Trains
Dedicated detection for trains and rail vehicles. Useful for transport, documentary, and landscape photography where trains are part of the scene. The camera locks onto the front of the train and tracks it as it moves through the frame.
💡 Kieran's Subject Detection Tips
• Auto mode is surprisingly good — use it when you're switching between subjects quickly
• For portraits, People mode with eye detection will nail focus more consistently than any manual approach
• Bird mode works better than Animal mode for birds — always use the dedicated mode
• Subject Detection works best combined with Wide Area (L) — gives the camera enough frame to detect the subject without too many options to confuse it
• If the camera locks onto the wrong subject, use the Record button (if assigned to Switch Eye/Subject) to jump to the correct one
• Head to the Advanced section to see how I combine Subject Detection with 3D tracking in my Boosted Subject Detection system
Back Button Focus (BBF)
Back Button Focus is one of those things people either love or hate — I love it, even though I hated it for the first 2–3 days of using it. Once I got used to it, I've never looked back.
Essentially, it disables the focusing function from the shutter button and you use the AF-ON button on the back of the camera to focus instead.
Why I Love BBF
With BBF your thumb does the focusing, so your finger is no longer half-holding down the shutter button and is now primed and ready to quickly depress the shutter when the moment is absolutely right.
I found this made a huge difference with my photography. When combined with AF-C, I constantly got the shots I wanted.
My thumb presses the AF-ON button when I want the camera to focus. My finger fires the shutter when I want to take the shot. Two separate jobs, two separate buttons — it's that simple.
The Practical Benefits
- Continuous tracking: Hold AF-ON and the camera tracks continuously. Release to freeze/lock focus — instantly.
- No accidental refocusing: Pressing the shutter never accidentally changes focus.
- One button, two modes: Tap AF-ON for AF-S behaviour. Hold it for AF-C behaviour. All from one button, no mode switching needed.
- Perfect for obstacles: Lock focus on your subject with AF-ON, remove your thumb, then recompose and shoot — the camera holds that exact focus distance.
GAME CHANGER Enable Back Button Focus
Menu → Custom Settings Menu (pencil icon) → a Autofocus → a6 AF Activation → AF-ON Only → Press OK to store
This disables focusing from the shutter button completely. The shutter button only fires the shutter. All AF control goes to the AF-ON button under your right thumb.
💡 Give It Time
It takes 1–2 shooting sessions to feel natural. The first day feels awkward — stick with it. Once you've adjusted, going back to shutter-button focus feels genuinely limiting. Your right thumb naturally rests near the AF-ON button on the Z9's integrated grip — the ergonomics are perfect for this technique.
Focus Point Orientation
The Z9 can remember separate focus point positions for landscape (horizontal) and portrait (vertical) orientations. When you rotate the camera, the focus point automatically switches to the position you last used in that orientation — saving you repositioning it every time you change grip.
RECOMMENDED Enable Focus Point Orientation
Menu → Custom Settings Menu (pencil icon) → a Autofocus → Store by Orientation → ON
Once enabled, place your focus point where you want it in landscape orientation, then rotate to portrait and move it to your preferred portrait position. The camera remembers both separately.
💡 Why This Matters
Portrait shooters typically want the focus point on an eye — which is usually off-centre in portrait orientation. Without this setting you'd have to manually reposition the focus point every time you rotate the camera. With it enabled, the camera just remembers where you like it for each orientation.
AF-C Focus Lock Confirmation
This is without doubt one of my favourite settings to change on the Z9. When shooting in AF-C with this setting enabled, when you focus on a subject you get a clear green focus point confirmation once the camera has acquired focus.
With this setting switched off (the default), the focus box stays white so you never get that visual confirmation of focus lock — this creates slight uncertainty, especially in fast-paced shooting. Enabling this gives you great peace of mind as you can clearly see when focus is locked on while using AF-C.
In AF-S the focus point always goes green to confirm a lock. I'm not sure why this is switched off by default for AF-C on the Z9, but you should enable this straight away.
CRITICAL Enable AF-C Focus Lock Confirmation
Menu → Custom Settings Menu (pencil icon) → a Autofocus → a11 Focus Point Display → move to "AF-C In-Focus Display" → press OK to enable
The focus point turns green when the camera confirms it has locked focus. Without this, the focus point stays the same colour whether locked or still hunting — you can't tell the difference at a glance.
💡 Why This Changes Everything
In sports and wildlife shooting, a green focus point tells you instantly your subject is sharp before you fire. If the point stays white, the camera is still hunting — wait an extra fraction of a second. This simple colour change dramatically increases your keeper rate because you only fire when focus is confirmed.
Focus Point Wrap Around
This sounds complicated but it's incredibly simple — all Focus Point Wrap Around does is enable you to keep moving your focus point from one side of the frame to the other continuously.
Normally when you keep moving the focus point to the left, it stops at the left edge of the frame. With this setting enabled, it continues moving left and comes out on the right side of the frame again — like a video game character walking off the edge of the screen.
It works the same moving your focus point up or down the frame too. Push past the top and you reappear at the bottom.
Enable Focus Point Wrap Around
Menu → Custom Settings Menu (pencil icon) → a Autofocus → a10 Focus Point Wrap-Around → Wrap
Press OK to enable. Set to No Wrap if you prefer the focus point to stop at the edges — useful if you frequently overshoot your desired position accidentally.
💡 When It Helps Most
Particularly useful when your subject is near one edge of the frame and you need to quickly move the focus point to the opposite side. Instead of scrolling all the way across the entire frame with the joystick, one push wraps you straight to the other side. Wildlife and sports photographers who constantly reposition focus points will feel the difference immediately.
Store Focus Position at Switch Off
This might seem like a very small thing for most photographers, but for landscape, macro, astrophotography, or product photographers this is massive.
By default, the focus always reverts back to infinity when you switch off the camera. This can be a pure pain if you're setting up a product shoot or waiting for the right conditions while shooting landscapes, macro, or astrophotography.
When you enable this feature, the camera remembers the exact focus position and doesn't move it when you switch on and off. This was honestly one of my pet hates until I found this setting.
RECOMMENDED Enable Focus Position Memory
Menu → Setup Menu (wrench icon) → Save Focus Position → On
Saves the lens focus position when the camera is switched off and restores it when powered back on. Essential for astrophotography, macro, and any situation where you've manually focused at a precise distance.
Cycle AF Area Modes Quickly
Assign a button to cycle through your most-used AF area modes with a single press — no need to hold a button and rotate the dial. This is a game-changer for fast-paced shooting where you need to switch focus approaches quickly.
RECOMMENDED Assign Cycle AF to a Button
Menu → Custom Settings Menu (pencil icon) → f Controls → f2 Custom Controls (Shooting) → choose button → AF-Area Mode (Switch)
Assign to Fn1, Fn2, or Fn3. You can specify exactly which AF area modes to cycle through — only include the ones you use.
📸 Recommended Cycle Modes
For wildlife photographers: cycle between Auto Area, Wide Area (L), and Single Point.
For portrait shooters: cycle between Wide Area (S), Single Point, and Auto Area.
For portrait shooters: cycle between Wide Area (S), Single Point, and Auto Area.
Kieran's Boosted Subject Detection System
This is the focus setup that enables you to capture the shot no matter what genre of photography you shoot. It combines Cycle AF, Subject Detection, and 3D Tracking into one seamless workflow — and it works across every shooting situation from portraits to wildlife to sport.
The goal is to build muscle memory so you never have to think about which AF mode you're in. Your brain stays focused on the moment, not the menu.
Step 1 — Set Up Cycle AF
Assign a button (Fn2 works well) to cycle through your three most-used AF area modes. Recommended cycle: Single Point → Wide Area (L) → Auto Area.
Menu → Custom Settings Menu → f Controls → f2 Custom Controls → Fn2 → AF-Area Mode (Switch)
Press the arrow right to select which modes to include in the cycle. Pick only the three you actually use — fewer presses to reach what you need.
Step 2 — Assign 3D Tracking to Fn1
Assign Fn1 to switch to 3D Tracking while held. This is the "boost" — press and hold Fn1 while in Wide Area to instantly hand off tracking to 3D mode.
Menu → Custom Settings Menu → f Controls → f2 Custom Controls → Fn1 → AF-Area Mode (Hold) → 3D-tracking
How to Use It
Shoot normally in Wide Area (L) with subject detection active. When you want the camera to follow your subject around the entire frame, press and hold Fn1 + AF-ON together. The camera switches to 3D tracking and locks on. Release Fn1 and your Wide Area box returns exactly where it was.
Critical Technique
Press and hold Fn1 AND AF-ON simultaneously while in AF-C. This is what activates the 3D tracking handoff. The moment you release Fn1, you're back in Wide Area mode.
Switch Eyes Feature
Assign the Movie Record button to Switch Eyes in subject detection. If the camera locks onto the wrong eye or wrong person, one press of the record button swaps to the other eye. It's perfectly positioned next to the shutter and doesn't interfere with video recording in video mode.
📸 Works For Every Genre
Wildlife: Wide Area until bird takes off → Fn1+AF-ON for full-frame 3D tracking
Portraits: Wide Area with People detection → boost to 3D if subject moves fast
Sport: Wide Area → boost to 3D tracking for unpredictable movement
Events/Weddings: Auto Area + People detection handles most situations automatically
Portraits: Wide Area with People detection → boost to 3D if subject moves fast
Sport: Wide Area → boost to 3D tracking for unpredictable movement
Events/Weddings: Auto Area + People detection handles most situations automatically
👁️ Switch Eyes Feature
When shooting with Eye AF and subject detection, the Z9 will choose which eye to focus on — but sometimes it picks the wrong one. The Switch Eyes feature lets you instantly swap to the other eye with a single button press, without losing your lock on the subject. It also works to switch between subjects when there are multiple people inside the AF area box.
📌 How Kieran Sets It Up
I set the Movie Record button to Switch Eyes in subject detection. It's perfectly placed — right next to the shutter button, easy to reach with your index finger without moving your hand. So if the camera locks onto the wrong eye, one press swaps to the other instantly.
Don't worry — this only affects stills mode. The Movie Record button still works normally for video recording when you're in video mode.
How to Assign Switch Eyes to the Movie Record Button
Menu → Custom Settings Menu (pencil icon) → f Controls → f2 Custom Controls → Movie Record Button → Subject Selection
In the list of assignable functions, scroll to Subject Selection. This assigns the Switch Eyes / Switch Subject function to the button while in photo shooting mode.
💡 When You Need This Most
Most useful in portrait, wedding, and event photography where you want the near eye sharp, or when two people are in the frame and the camera locks onto the wrong person. Rather than moving your focus point manually or losing the shot, one press of the Record button cycles the focus to the correct eye or subject.
Focus Limiter
The Focus Limiter lets you restrict the autofocus search range to a specific minimum and maximum distance. This stops the lens hunting through its entire focus range and dramatically speeds up AF acquisition in situations where you know roughly how far away your subject is.
It's especially useful when there are obstacles between you and your subject — glass at a hockey rink, reeds in wildlife photography, a close foreground that might confuse the AF — by setting a minimum distance, the camera simply ignores anything closer and locks onto what matters.
RECOMMENDED Assign Focus Limiter to a Button
Menu → Custom Settings Menu (pencil icon) → f Controls → f2 Custom Controls → choose button → Focus Limiter
Assign to the joystick centre press or Fn3. Hold the button for 1 second to bring up the limiter menu. Front dial sets the Far limit; rear dial sets the Near limit. Press OK to confirm.
💡 When to Use the Focus Limiter
• Hockey / sports through glass: Set minimum distance beyond the glass to stop AF locking on reflections
• Wildlife through reeds or branches: Set minimum to just beyond the foreground obstruction
• Macro photography: Restrict range to avoid the lens hunting the entire focus throw
• Portrait work with distracting foregrounds: Set a near limit to keep AF on your subject
• Wildlife through reeds or branches: Set minimum to just beyond the foreground obstruction
• Macro photography: Restrict range to avoid the lens hunting the entire focus throw
• Portrait work with distracting foregrounds: Set a near limit to keep AF on your subject
Focus Peaking for Manual Focus
Focus Peaking highlights the in-focus edges of your scene with a coloured overlay in the viewfinder. Rotate the lens focus ring and watch for the highlights — when they appear strongest on your subject, focus is nailed.
RECOMMENDED Enable Focus Peaking
Menu → Custom Settings Menu (pencil icon) → a Autofocus → a13 Focus Peaking → Focus Peaking Display
- Peaking Colour: Red is most visible in most scenes. White for very colourful subjects.
- Low (1): Only sharpest areas highlighted — for critical macro and product work
- Standard (2): Balanced — good for most use cases
- High (3): Aggressive highlighting — helpful in low light or low contrast scenes
🎯 Pro Technique: Peaking + Magnification
1. Enable focus peaking
2. Press the Zoom In button (Button 30) to magnify the view to your focus area
3. Fine-tune focus using the peaking highlights
4. Press Zoom Out (Button 29) to return to full view
This combination gives you incredibly accurate manual focus — essential for landscapes, macro, and astrophotography.
2. Press the Zoom In button (Button 30) to magnify the view to your focus area
3. Fine-tune focus using the peaking highlights
4. Press Zoom Out (Button 29) to return to full view
This combination gives you incredibly accurate manual focus — essential for landscapes, macro, and astrophotography.
Focus Shift Shooting (Focus Stacking)
Focus Shift automatically takes a series of images at incrementally different focus distances, from near to far. These frames are then stacked in post-processing software to create images with extraordinary depth of field — far beyond what any single aperture can achieve.
Enable Focus Shift
Menu → Photo Shooting Menu (camera icon) → Focus Shift Shooting
Set the number of shots, focus step width, and interval. The Z9 automates the whole sequence — use a tripod for best results.
💡 Settings Guide
Number of shots: 20–40 for most macro/product work
Focus step width: 1–3 for close-up work, 5–10 for landscapes
Focus starting point: Set your lens to its closest focus point before starting
Stacking software: Luminar Neo Focus Stacking extension, or Photoshop (Auto-Blend Layers)
Focus step width: 1–3 for close-up work, 5–10 for landscapes
Focus starting point: Set your lens to its closest focus point before starting
Stacking software: Luminar Neo Focus Stacking extension, or Photoshop (Auto-Blend Layers)
AF Fine Tune — Lens Calibration
For mirrorless Z-mount lenses this is rarely needed — the Z9's on-sensor phase detection is exceptionally accurate and most Z lenses are very well calibrated from the factory. That said, the occasional user has reported that a small adjustment helped them slightly with a specific lens. If you regularly notice very slight front-focus or back-focus tendencies with a particular lens, AF Fine Tune lets you dial in a small correction — from -20 to +20 — stored per lens and applied automatically whenever that lens is attached.
F-mount lenses via the FTZ II adapter are more likely to benefit from fine-tuning than native Z-mount lenses.
Enable & Set AF Fine Tune
Menu → Setup Menu (wrench icon) → AF Fine-Tune → AF Fine-Tune (On/Off) → ON, then select Saved Value
With AF Fine-Tune on, select the lens from the list and dial in a value. Negative values correct back focus (move focus forward). Positive values correct front focus (move focus back).
💡 How to Test Your Lens
1. Set up a focus chart or ruler at 45° on a flat surface in good light
2. Use AF-S, single point, with the camera on a tripod
3. Focus on the centre mark and shoot at widest aperture
4. Review at 100% — if focus falls behind the target mark, add a negative value; if in front, add a positive value
5. Test in increments of 5 until the focus is centred on the mark
2. Use AF-S, single point, with the camera on a tripod
3. Focus on the centre mark and shoot at widest aperture
4. Review at 100% — if focus falls behind the target mark, add a negative value; if in front, add a positive value
5. Test in increments of 5 until the focus is centred on the mark
⚠️ When NOT to Fine Tune
If the issue only appears at one distance or with specific subjects, it's likely a depth of field or technique issue rather than a focus calibration problem. Only tune if you see consistent front or back focus across multiple shots at medium distance.
⚠️ Back Up Your Settings First!
Before you change any settings, I strongly recommend saving your current camera setup to your memory card. This gives you a safety net — if you accidentally change something and can't remember what it was, you can simply restore everything to your default good settings in seconds.
Or if your camera happens to jam up and needs to be reset, this backup is like a snapshot of your entire camera configuration — you're back up and running instantly.
One wrong setting can sometimes throw you off, so having that backup on your card at all times is just good practice.
💾 How to Save Your Settings to Card
Menu → Setup Menu (spanner icon) → Save/Load Settings → Save Settings → Yes
This saves a .BIN file to your memory card. You can also keep this on a second card in your bag — it's your insurance policy.
🔄 How to Restore Your Settings from Card
Menu → Setup Menu (spanner icon) → Save/Load Settings → Load Settings → and that's it.
The camera will load every setting instantly. You're back to exactly where you were — all memory banks, custom buttons and preferences restored as if nothing happened.
💡 It's also worth backing up your settings whenever you change something you're happy with — that way your backup is always up to date.
Essential Z9 Settings
These are the settings you should configure after getting your Z9 out of the box. Not all defaults are optimal for real-world photography.
Image Format: RAW vs HEIF vs JPEG
NEF (RAW) — 45.7MP
Maximum quality. Contains all data captured by the sensor — full editing flexibility in Lightroom, Capture NX-D, or any RAW processor. Larger files (~50–80MB each). Use for all paid work and any images you want to edit seriously.
HEIF (HE★ / HE)
High Efficiency Image Format. 10-bit colour depth with smaller files than RAW. Excellent quality with broad highlight range. A great alternative to JPEG when file size matters but quality must be higher than standard JPEG. Growing software support.
JPEG Fine (★)
Compressed, processed-in-camera. Smaller files, immediately shareable. For high-speed bursts (120fps requires JPEG/HEIF), event sports wire work, or when you don't need to edit images at all.
CRITICAL Set Image Quality
Menu → Photo Shooting Menu (camera icon) → Image Quality
Or: Hold QUAL button and rotate the rear command dial. Set to NEF (RAW) for normal photography. Set to JPEG/HEIF for high-speed burst modes.
⚠️ Important: High-Speed Burst Modes
The Z9's fastest burst modes (C30, C60, C120) require JPEG or HEIF — RAW is not available at these speeds. At 20fps and below, 14-bit RAW is available. Plan your format based on what you're shooting.
Enable & Adjust Auto ISO
Menu → Photo Shooting Menu → ISO Sensitivity Settings
Turn Auto ISO ON. Set your maximum ISO to what you're comfortable with (6,400 is a safe starting point — the Z9 is very clean up to this level).
Max Auto ISO Testing
Test different maximum ISO settings at home in low light to find your personal acceptable limit. The Z9's 45.7MP stacked sensor delivers very good high-ISO performance. Many photographers push to ISO 12,800 or even 25,600 for sports and events. A noisy sharp image is always better than a blurred clean one.
Quick ISO Toggle
Hold the ISO button and rotate the front dial to toggle between Auto ISO and manual ISO. Hold the ISO button and rotate the rear dial to change the manual ISO value.
Sensor Shield
When the Z9 powers off, the sensor shield drops down to physically protect the sensor from dust during lens changes. The sensor develops a static charge during use that actively attracts dust — the shield prevents this ingress.
RECOMMENDED Enable Sensor Shield
Menu → Setup Menu (wrench icon) → Sensor Shield Behaviour At Power Off → Sensor Shield Closes
Press OK to confirm. This enables the shield to drop automatically on power-off. A confident lens-change camera.
Vibration Reduction (VR) Settings
The Z9 has IBIS (In-Body Image Stabilisation) — up to 6 stops of stabilisation working in conjunction with VR-equipped lenses. Configure VR correctly for different shooting situations.
Normal VR Mode
Standard stabilisation for handheld photography — panning and general use. The default for most shooting.
Sport VR Mode
Reduces EVF judder during high-speed burst shooting. The viewfinder stabilises between frames, making tracking moving subjects much easier in CL/CH/C30 modes.
RECOMMENDED VR for Burst Shooting
Menu → Photo Shooting Menu (camera icon) → Vibration Reduction → Sport
Switch to Sport mode for all action/burst photography. This dramatically reduces the jumping/jittery effect you can see in the EVF during high-speed bursts.
⚠️ VR on a Tripod
Turn VR OFF when shooting on a stable tripod at slow shutter speeds (under 1/30s). VR detects tiny movements and can actually introduce shake on a tripod. Most Z lenses have a tripod detection feature, but it's best practice to disable VR manually for static shots.
Extended Shutter Speeds
Enable extended shutter speeds to go beyond 30 seconds without an external trigger. Options extend to 900 seconds (15 minutes) for ultra-long exposures.
LONG EXPOSURE Enable Extended Shutter Speeds
Menu → Custom Settings Menu (pencil icon) → Shooting/Display → d6 Extended Shutter Speeds (M) → ON
Adds shutter speeds of 60s, 90s, 120s, 150s, 180s, 240s, 300s, 480s, 600s, 720s, and 900s to Manual mode.
💡 For Star Trails and Night Work
With the Z9's electronic shutter, there's zero shutter shock — perfect for long exposures. Enable this and you can shoot 15-minute star trail segments without any external remote or intervalometer.
Power Off Delay (Monitor Off Delay)
Controls how long displays stay on before the camera saves power. Balance battery life with shooting convenience.
Menu → Custom Settings Menu (pencil icon) → C Timers/AE Lock → C3 Monitor Off Delay
Playback
How long the LCD stays on when reviewing images. Recommended: 10–20 seconds. Set to 1 minute if you review images frequently.
Live View / Shooting
How long the display stays active during shooting. Recommended: 1–5 minutes. Don't set this too short or the camera sleeps in the middle of a shoot.
Information Display
How long the rear LCD stays on showing shooting info. 10–30 seconds is usually fine.
💡 Battery vs Convenience
The Z9's EN-EL18d battery is so large that most photographers leave display delays quite long (2–5 minutes) without any concern for battery life. The 2,100-shot capacity means you rarely need to be conservative with power management.
Release Button to Use Dial
By default, to change a setting like ISO or White Balance on the Z9 you have to hold the button and rotate the dial at the same time. This can feel awkward, especially with one hand. Enabling Release Button to Use Dial means you just press the button once, release it, and then rotate the dial — no need to hold both simultaneously.
RECOMMENDED Enable Release Button to Use Dial
Menu → Custom Settings Menu (pencil icon) → f Controls → f8 Release Button to Use Dials → Yes
Once enabled: press ISO button, release it, then rotate dial to change ISO. Much more natural, especially when shooting one-handed or with the camera to your eye.
💡 How It Changes Your Workflow
Without it: Hold ISO button + rotate rear dial at same time
With it: Press ISO button → release → rotate rear dial at your own pace
This applies to all button+dial combinations: ISO, White Balance, Exposure Compensation, QUAL, WB and BKT buttons. It makes these controls much more comfortable to use quickly.
With it: Press ISO button → release → rotate rear dial at your own pace
This applies to all button+dial combinations: ISO, White Balance, Exposure Compensation, QUAL, WB and BKT buttons. It makes these controls much more comfortable to use quickly.
Burst Modes — Z9 Speed Options
The Z9's electronic shutter enables extraordinary burst speeds. Here are all available continuous shooting modes:
Single Frame (S)
One photo per shutter press. For landscapes, posed portraits, architecture — anything where you're not firing in bursts.
CL — Continuous Low (1–9fps)
User-selectable frame rate from 1 to 9fps. At lower fps, 14-bit RAW with full buffer. Great for weddings, events, or when you want more control than a full-blast burst.
CH — Continuous High (10–20fps)
Up to 20fps at full 45.7MP 14-bit RAW resolution. The workhorse mode for professional sports and wildlife — maximum quality at serious speed.
C30 — 30fps
30fps at full resolution RAW (compressed). The sweet spot between speed and quality. Very popular for bird photography and motorsport.
C60 — 60fps
60fps at reduced resolution. Excellent for catching critical peak moments — ball sports, action peaks, expressions. RAW not available at this speed.
C120 — 120fps
120fps at approx. 11MP JPEG resolution. Maximum speed mode. For ultra-fast action analysis, peak moment capture, or situations where getting the shot matters more than file size.
📸 Kieran's Recommended Burst Modes
Wildlife / Birds: C30 for quality + speed balance
Sports / Soccer / Rugby: CH (10–20fps) in RAW
Peak moment capture: C60 or C120 in JPEG
Portraits / Events: CL at 3–5fps in RAW
Landscapes / Architecture: Single Frame (S)
Sports / Soccer / Rugby: CH (10–20fps) in RAW
Peak moment capture: C60 or C120 in JPEG
Portraits / Events: CL at 3–5fps in RAW
Landscapes / Architecture: Single Frame (S)
How to Change Burst Mode
Hold the Burst Mode button and rotate the rear command dial to cycle through modes. The current mode is shown on the top LCD panel and in the viewfinder.
Metering Modes
Matrix Metering (default)
Evaluates the entire scene and calculates exposure based on lighting patterns, colours, and subject position. Excellent all-round metering for most situations. Leave on Matrix for 90% of shooting.
Centre-Weighted Metering
Biases the exposure reading towards the centre of the frame, fading to the edges. Good for portraits where the subject fills most of the frame.
Spot Metering
Reads exposure from a very small area (~4mm diameter, 1.5% of frame) at the current AF point. Use when you need precise exposure on a specific small area — backlit subjects, stage performances, wildlife against bright sky.
Highlight-Weighted Metering
Specifically protects bright highlights from blowing out. Ideal for stage shows, concerts, or any scene with bright artificial lighting sources. The camera exposes to preserve the bright areas.
📸 Metering Mode Tips
Assign metering mode change to the i button (quick settings) for fast access. For most photography, Matrix metering with exposure compensation adjustment gives excellent results and is far more reliable than constantly switching modes.
HDR (High Dynamic Range) Mode
HDR mode automatically takes two exposures and merges them in-camera to preserve detail in both bright highlights and deep shadows — situations where the scene's dynamic range exceeds what a single exposure can capture cleanly. Classic use case: bright sky with a darker foreground in landscape photography.
Menu → Photo Shooting Menu → HDR (High Dynamic Range)
HDR Mode: On (Series) shoots HDR every time. On (Single Photo) shoots one HDR merge then reverts to normal.
HDR Strength: Auto, Low, Normal, High — how aggressively the tones are blended. Auto works well for most scenes.
HDR Strength: Auto, Low, Normal, High — how aggressively the tones are blended. Auto works well for most scenes.
Auto
Camera analyses the scene and selects an appropriate blend strength. Good starting point.
Low
Subtle merge — natural-looking result. Ideal for landscapes and architecture where you want extended range without an obvious processed look.
Normal / High
More aggressive tone-mapping. Can start to look unnatural at High — surreal or painterly effect. Use for creative impact rather than natural realism.
⚠️ HDR Limitations
• Requires a tripod — movement between frames causes ghosting
• JPEG output only — HDR cannot produce RAW files
• Moving subjects ghost badly — avoid for people or wind-blown foliage
• For RAW HDR, shoot bracketed frames manually and merge in Lightroom or Photomatix
• Given the Z9's exceptional 14-stop dynamic range at ISO 64, manual bracketed RAW is often the better professional approach
White Balance In Depth
White balance tells the Z9 what "white" looks like under your current lighting so all colours appear natural. Getting it right in-camera saves time in post — especially important for JPEG shooters and for colour-consistent event or product photography.
Auto (A)
Camera adjusts automatically per shot. Excellent for changing light. Can shift between frames in a sequence — avoid for consistent colour across a portrait or event shoot.
Daylight (~5200K)
Direct sun outdoors. Warm, natural tones. Great for consistent colour when shooting in unchanging sun.
Cloudy (~6000K)
Overcast sky. Slightly warmer than Daylight — compensates for the cool blue of cloud cover. A landscape favourite.
Shade (~8000K)
Very warm — corrects the extremely blue light of open shade. Gives golden, flattering skin tones for outdoor portraits in shade.
Fluorescent (~4200K)
Corrects the green cast common under fluorescent tubes. Essential for indoor venues, offices, and gyms.
Kelvin (K) — Manual
Set an exact colour temperature from 2500K–10000K. Most consistent for studio, event, and product work with controlled lighting. Use 5500K as a starting point for flash.
PRE — Preset / Custom WB
Measure from a neutral grey or white card under your actual lights. The most accurate method. Essential for commercial and product photography.
Setting a Custom White Balance
Hold WB button → rotate rear dial to PRE → point at white/grey card → half-press shutter → confirm
The camera measures the colour of the light hitting the card and stores it as a custom preset. Update any time you change location or lighting.
WB Fine-Tune
Menu → Photo Shooting Menu → White Balance → select preset → press right arrow → fine-tune grid
Shift any WB preset on a green-magenta and blue-amber axis. If Auto WB always looks slightly cool or warm, dial in a permanent offset instead of correcting every shot in post.
💡 RAW vs JPEG Shooters
RAW: WB is changed in post with zero quality loss. Use Auto and correct in Lightroom — exposure matters far more than WB in-camera.
JPEG: WB is baked in at capture. Use Kelvin or PRE for consistency across a shoot.
JPEG: WB is baked in at capture. Use Kelvin or PRE for consistency across a shoot.
Picture Controls
Picture Controls determine how the Z9 processes JPEG and HEIF images in-camera — affecting sharpness, contrast, saturation, and tone. For RAW shooters they act as a preview in the viewfinder and can be changed freely in post. For JPEG shooters they're baked in at capture, so choosing the right one matters.
Menu → Photo Shooting Menu → Set Picture Control
Auto
Camera analyses the scene and adjusts tone and colour automatically. Good general-purpose JPEG setting for varied shooting.
Standard
Balanced processing — moderate sharpness and contrast. A reliable all-rounder and good starting point for most photography.
Portrait
Softer sharpening and warmer tone to flatter skin. Reduces contrast slightly to preserve highlight detail in faces. Ideal for people photography in JPEG.
Landscape
Boosts greens and blues for vivid outdoor scenes. Higher contrast and saturation. Makes skies pop and foliage vibrant straight out of camera.
Vivid
Maximum colour saturation and contrast. Very punchy, graphic look. Great for product and social media photography where impact matters.
Monochrome
Black and white output. Filter effects (yellow, orange, red, green) dramatically change how tones render. A favourite for street and documentary work. RAW still captures full colour data.
Flat
Low contrast, low saturation — maximum editing headroom. The best choice for JPEG shooters who do heavy post-processing. Often used as a starting point for video colour grading too.
Fine-Tuning a Picture Control
Every Picture Control can be fine-tuned. Select a control, press the right arrow, and you can adjust sharpening, clarity, contrast, brightness, saturation, and hue independently. Save a customised version with a name of your choice.
💡 RAW vs JPEG
RAW shooters: Picture Control only affects the preview image in-camera and the embedded thumbnail. It has zero effect on your actual RAW data. You can ignore this setting entirely and apply any look in Lightroom or Capture One. JPEG shooters: choose carefully — it's baked into every photo.
📐 Grid Lines for Composition
⚙️ How to Turn On Grid Lines — Two Steps Required
Step 1 — Choose grid type: Menu → Custom Settings Menu (pencil icon) → d Shooting/Display → d16 Grid Type → Choose your grid
⚠️ Selecting the type alone does not make the grid appear on screen. You must also complete Step 2 below.
Step 2 — Enable the display: Menu → Custom Settings Menu (pencil icon) → d Shooting/Display → d19 Custom Monitor Shooting Display
In the d19 screen you will see up to 4 display slots. Use the multi-selector to highlight whichever slot you want to add the grid to, then press the right arrow button. A list of display elements appears — scroll down to Framing Grid and press OK to tick it. Press the Menu button to save and exit.
Once saved, press the DISP button while shooting to cycle through your display modes until you reach the one with the grid ticked. The grid will now appear as an overlay. Repeat in d20 Custom Viewfinder Shooting Display if you also want the grid in the EVF.
Grid lines overlay a compositional guide directly onto your viewfinder and live view screen without affecting your images. They are purely a visual aid and do not appear in your photos.
Grid Types Available on the Z9
3×3 (Rule of Thirds)
The most useful for general photography. Divides the frame into 9 equal sections. Place your subject on one of the four intersection points — where the lines cross — for a more dynamic composition than dead centre.
4×4 Grid
Finer grid with more reference lines. Useful for architectural photography and any situation where keeping horizontal and vertical lines perfectly straight is critical.
5:4 Crop Outline
Shows the frame boundary for a 5:4 aspect ratio crop. Useful when composing images that will be printed at 8×10 or similar — lets you see exactly what will be cropped before you shoot.
16:9 Crop Outline
Shows the frame boundary for a 16:9 widescreen crop. Ideal for composing images intended for TV, video thumbnails, or widescreen display.
💡 Kieran's Tip
I use the 3×3 rule of thirds grid for most landscape and portrait work. The key is to keep your horizon on the top or bottom third line rather than running through the middle of the frame — that single change makes a huge difference to how your images look. Turn it off once placing the grid lines becomes instinctive.
Reading the Histogram & Exposure
The histogram is the most reliable exposure tool on the Z9. It shows the exact distribution of tones from pure black (left) to pure white (right). Learning to read it properly means you'll never be fooled by a bright or dark LCD in changing light.
Spikes touching the left edge
Clipped shadows — detail lost in dark areas. Less critical in RAW as shadows can often be recovered. Increase exposure if shadow detail matters.
Spikes touching the right edge
Clipped highlights — detail permanently lost in bright areas. The more serious problem — hard to recover even in RAW. Reduce exposure.
Graph bunched in the middle
Well-exposed midtones. Fine for most scenes. If the LCD looks too dark or bright, trust the histogram over the screen.
ETTR — Expose to the Right
For RAW photography, Expose to the Right (ETTR) means making the histogram as far right as possible without clipping highlights. The right side of the sensor captures the most data, giving cleaner shadows and less noise when you adjust in post.
💡 ETTR in Practice
Increase exposure until the histogram nearly touches the right edge without overflowing. The image may look slightly bright on the LCD — that's normal. In Lightroom, pull exposure back 0.5–1 stop and your shadows will be dramatically cleaner than if you'd exposed darker in-camera.
Enable Highlight Warning (Blinkies)
Menu → Playback Menu → Playback Display Options → tick Highlights
Blown highlights flash black and white in playback. A quick glance shows if any highlights are clipped. Enable this and check it after every critical shot in high-contrast lighting.
Live Histogram in the Viewfinder
Menu → Custom Settings Menu → d Shooting/Display → d7 Shooting Info Display → add Histogram
Shows a live histogram in the EVF while you're composing the shot. The RGB histogram (separate red, green, blue channels) is more accurate than the luminosity version for catching colour-channel clipping.
Built-in GPS Setup
The Z9 has built-in GPS — a feature not found on the Z8. It automatically records your location (latitude, longitude, altitude) in the EXIF data of every image. No phone, no app, no external device needed.
Z9 ONLY Enable Built-in GPS
Menu → Setup Menu (wrench icon) → Location Data → Position → Enable
Allow the camera to acquire a GPS fix. First acquisition takes 1–2 minutes in open sky. Subsequent locks are much faster.
Sync Clock from Satellite
Menu → Setup Menu → Location Data → Sync Clock from Satellite → ON
Uses GPS satellite signals to keep your camera clock perfectly accurate. Set this to ON — it's one of the best reasons to have built-in GPS.
💡 GPS Tips
• GPS draws extra power — the EN-EL18d handles this easily, but be aware on very long shoots
• Initial GPS acquisition requires clear sky view — do this before heading into forests or buildings
• Your location data appears in Lightroom, Capture NX-D, and any EXIF-reading application
• For travel photography, location data is invaluable for organising shoots by location
• Initial GPS acquisition requires clear sky view — do this before heading into forests or buildings
• Your location data appears in Lightroom, Capture NX-D, and any EXIF-reading application
• For travel photography, location data is invaluable for organising shoots by location
AE Lock — Exposure Lock
AE Lock (Auto Exposure Lock) freezes the camera's metering so you can recompose without the exposure changing. This is essential when the subject and the metered area are in different parts of the frame — metering off a bright sky then recomposing down to a darker subject, for example.
How to Use AE Lock
By default, pressing the AEL button (top right back of camera) locks the current exposure. The AEL indicator appears in the viewfinder. Recompose and shoot — the exposure stays locked until you release the button or take the shot.
AE-L (Hold)
Holds exposure as long as you keep pressing the button. Release to unlock. Most common mode for quick exposure lock.
AE-L (Toggle)
Press once to lock, press again to unlock. Useful for longer sequences where you want the same exposure across many shots.
Customise the AEL Button Behaviour
Menu → Custom Settings Menu (pencil icon) → c Timers/AE Lock → c1 Shutter-Release Button AE-L
Control whether the shutter button also locks exposure on half-press. For BBF users, set this to OFF so the shutter half-press never accidentally locks exposure.
💡 When AE Lock Is Most Useful
• Backlit subjects: Meter off a mid-tone, lock, then recompose on your subject
• Consistent event coverage: Lock exposure for a run of shots under the same light
• Mixed lighting: Lock a good exposure before panning across a scene with bright and dark areas
• Spot metering portraits: Meter off the face, lock, recompose for a wider shot
• Consistent event coverage: Lock exposure for a run of shots under the same light
• Mixed lighting: Lock a good exposure before panning across a scene with bright and dark areas
• Spot metering portraits: Meter off the face, lock, recompose for a wider shot
Flicker Reduction
Artificial lighting — fluorescent tubes, LED fixtures, stadium lights — pulses at the frequency of the local mains power supply (50Hz or 60Hz). At high shutter speeds, the Z9's electronic shutter can capture images at different points in this pulse cycle, causing inconsistent exposure and colour banding between frames in a burst. Flicker Reduction detects the pulse and times each shot to the peak of the light cycle.
Photo Flicker Reduction
Menu → Photo Shooting Menu → Photo Flicker Reduction → Enable
Detects flicker frequency and synchronises the shutter release to the peak of the light cycle. May add a very slight shutter delay. Essential for indoor sports and events under artificial lighting.
High-Frequency Flicker Reduction
Menu → Photo Shooting Menu → High-Frequency Flicker Reduction → Enable, then select 50Hz or 60Hz
For modern LED lighting which flickers at much higher frequencies than traditional fluorescent. Use 50Hz in Europe, Ireland, UK, Australia. Use 60Hz in USA, Canada, Japan. Wrong setting = more banding, not less.
💡 When You Need This
If you see horizontal banding or uneven exposure across images in a burst — especially under stadium floodlights, gym lighting, office fluorescents, or stage lighting — enable flicker reduction immediately. Essential for indoor sports, concerts, and events.
⚠️ Note on Shutter Speeds
Flicker reduction works most reliably at shutter speeds that are multiples of the power frequency: 1/50s, 1/100s, 1/200s for 50Hz lighting. At very fast shutter speeds (1/2000s+) banding can still occur because the exposure is shorter than one cycle. If banding persists at high speeds, enable High-Frequency Flicker Reduction.
DX Crop Mode
DX crop uses the central 1.5× area of the 45.7MP sensor, giving the equivalent reach of a 1.5× teleconverter with no optical quality loss. Results are approximately 19.4MP — more than enough for professional use including large prints.
Switch Between FX and DX
Press Image Area button (Button 32) → select FX, DX, or 1×1 square
A crop frame indicator appears in the viewfinder showing the active area when DX is selected.
Wildlife & Birds
Turn a 500mm into an effective 750mm instantly. At 19.4MP birds in flight at distance are perfectly usable for professional and editorial work.
Sports & Action
Extra reach when you can't get closer. The Z9 maintains full burst speed and all AF performance in DX mode.
DX Auto Crop
Menu → Photo Shooting Menu → Image Area → DX Auto Crop → ON
When a DX-format Z lens is attached, the camera automatically crops to DX to avoid heavy vignetting.
📸 Effective Focal Length in DX Crop
200mm → 300mm · 300mm → 450mm · 400mm → 600mm · 500mm → 750mm · 600mm → 900mm
SnapBridge Setup & Use
SnapBridge is Nikon's free companion app (iOS & Android) that maintains a persistent Bluetooth connection to the Z9 and automatically transfers a small JPEG of every photo you take to your phone — instantly shareable without touching a computer.
Pairing for the First Time
Step 1 — Enable Bluetooth
Menu → Network Menu (antenna icon) → Bluetooth → Enable
Step 2 — Open SnapBridge on Your Phone
Download SnapBridge (free). Tap Connect to Camera → select Nikon Z9.
Step 3 — Confirm on Both Devices
A pairing code appears on both screens. Confirm on camera and phone. Only needs to be done once — the Z9 remembers your phone.
Auto Photo Transfer
SnapBridge app → Auto Link → ON
Every photo is automatically sent as a 2MP JPEG to your phone's camera roll in the background. Perfect for instant social media sharing from a shoot.
Remote Shooting
SnapBridge app → Remote Photography
Control the Z9's shutter remotely from your phone. Adjust exposure, trigger the shutter, and see a live preview. Great for self-portraits, wildlife remotes, and group shots.
💡 SnapBridge Tips
• Keep Bluetooth always on — the EN-EL18d handles the drain easily
• Switch to Wi-Fi for full-resolution RAW transfer at end of shoot
• SnapBridge can use your phone's GPS to geotag photos when the Z9's GPS hasn't locked yet
• For fastest Wi-Fi transfer: Network Menu → Wi-Fi → Connect to Smart Device
• Switch to Wi-Fi for full-resolution RAW transfer at end of shoot
• SnapBridge can use your phone's GPS to geotag photos when the Z9's GPS hasn't locked yet
• For fastest Wi-Fi transfer: Network Menu → Wi-Fi → Connect to Smart Device
Tips & Tools
Quick reference tools, calculators, cheat sheets, and essential downloads — everything you need in one place.
🧮 ND Filter Long Exposure Calculator
Calculate your new exposure time when using an ND filter.
Golden Hour & Blue Hour Calculator
Plan your shoots with precise golden hour and blue hour times for any location and date. Includes interactive map with sunrise/sunset directions. Simply add your location Country & town, then click on find location, next select your date and then click on calculate Photography times.
⚠️ Note:
Internet access is required to find new locations and display the satellite map. Times can still be calculated offline for previously saved locations.
📍 Selected Location
Click on the map to select your location
📅 Date
🛰️ Satellite view • Click anywhere to select location
🔢 Depth of Field & Hyperfocal Calculator
Calculate your depth of field and hyperfocal distance for the Z9's 45.7MP full-frame sensor (CoC = 0.030mm).
💡 What is Hyperfocal Distance?
The hyperfocal distance is the closest focus point at which everything from half that distance to infinity is acceptably sharp. For landscape photography, focus at the hyperfocal distance and you maximise the depth of field — getting the foreground and distant mountains both sharp in one shot.
⭐ NPF Rule — Astrophotography Shutter Speed Calculator
Calculate the maximum shutter speed before stars start to trail in your images. The NPF rule is more accurate than the old 500 rule because it accounts for your aperture, pixel pitch, and declination as well as focal length.
💡 Why NPF Instead of the 500 Rule?
The old 500 rule (500 ÷ focal length) was designed for low-resolution film cameras. The Z9's 45.7MP sensor has a very fine pixel pitch of 4.35μm — much smaller than older sensors — which means stars trail much faster on it. The NPF rule accounts for your actual pixel pitch and gives a more accurate maximum exposure time, often 30–50% shorter than the 500 rule suggests.
🌟 Z9 Astrophotography Settings
Beyond the shutter speed, these settings give the best results on the Z9 for astrophotography:
- ISO: Start at ISO 3200–6400. The Z9 handles noise very well — push it if needed
- Aperture: Widest available — f/1.8 or f/2.8. Diffraction isn't a concern at wide apertures in dark skies
- Focus: Manual focus. Use Live View, zoom to a bright star, and focus until it's a pinpoint
- Long Exposure NR: Turn OFF — it doubles your interval time and is unnecessary with modern sensors
- VR: OFF — you're on a tripod and VR can introduce micro-movement on long exposures
- Store Focus Position: ON — so the camera remembers your focus point when powered back on
- Interval Timer: Use it for star trail stacking instead of one very long exposure
🌙 Moon Phase Calculator
Calculate the current moon phase, illumination, and moonrise/moonset times for any date and location. Essential for planning astrophotography shoots — shoot during new moon for dark skies, or use the full moon as a dramatic subject.
⚠️ Internet access required to find new locations and display the map. Click anywhere on the map to select your location.
📍 Selected Location
Click on the map to select your location
🌙 Satellite view • Click anywhere to select location • Blue line = moonrise • Purple line = moonset
🌑 Best Nights for Astrophotography
The ideal window for Milky Way and deep-sky photography is the 7 days either side of a new moon — this gives you the darkest skies. Avoid the 5 days around a full moon as the bright moonlight washes out the stars and raises your sky background significantly.
- New Moon ± 3 days: Darkest skies — best for Milky Way core shots
- Crescent phase: Moon sets early, leaving dark skies after midnight
- Full Moon: Avoid for Milky Way but beautiful for landscape moon shots
- Waning Gibbous: Moon rises late — shoot early evening before it rises
👤 Portrait Settings
📸 Focal Length
For portraits it's generally a good idea to use focal lengths of between 50mm–200mm as these are more flattering for your subject.
- 50–70mm: Ideal for full-length shots in more confined spaces
- 85–200mm: Great from full-length all the way to headshots. For headshots I generally prefer 105–200mm so you're not right on top of your subject but can still communicate easily
Lens Recommendations
The ideal lens for versatile portrait work is the Z 70-200mm f/2.8 S — covers every portrait scenario in one zoom. For more specialist work, the Z 85mm f/1.2 S or Z 135mm f/1.8 S Plena deliver sublime rendering and bokeh.
🎛️ Program Mode
Manual mode is my preference as you have far greater control of your look and exposure. Aperture Priority also works well — just watch your shutter speed doesn't drop too low. There's nothing worse than a blurred portrait.
🎯 Focus Settings
Use Eye AF / People subject detection for focusing. My preferred AF area mode is Wide Area (L) — large enough for subject movement but focused enough to avoid confusion. Use the Boosted Subject Detection system — press Fn1 to instantly engage 3D tracking so no matter how quickly your subject moves, you can track them around the frame.
⚡ Shutter Speed
A minimum of 1/125s is needed. For moving subjects or longer focal lengths, go faster. For fast-moving children use 1/500s as a starting point — if you still can't freeze the action, jump to 1/1000s. Enable IBIS in Sport mode for burst shooting.
📷 Aperture
A shallow depth of field — f/1.2 to f/4 — isolates your subject from the background, making them pop from the scene. The wider the aperture, the more background blur. Be careful at f/1.2–f/1.8 as depth of field is very shallow and focus must be precise.
🔆 ISO
Leave ISO at base (64) unless you're in lower light and need to boost it. With the Z9's sensor, Auto ISO with a ceiling of 3200–6400 is safe for portraits.
🌙 Low Light Portraits
Set your pre-tested Max Auto ISO so you can leave the camera on Auto ISO without worrying about it. Using flash in TTL mode is an excellent option — natural fill light that the camera balances automatically with the ambient exposure.
Quick Reference
Mode: M or A · Aperture: f/1.2–f/4 · Shutter: 1/125s min · ISO: Auto (max 3200–6400) · AF: AF-C + Wide Area (L) + People detection · Drive: CL 3–5fps · IBIS: Sport mode
🏔️ Landscape Settings
📸 Focal Length
For landscapes it's not straightforward — shooting wide increases the amount of scenery in your frame but also alters the sense of distance between foreground and background. A 50mm focal length gives a perspective similar to what the human eye sees naturally. Playing with focal length has a huge effect on how the viewer interprets the scene — there's no single right answer.
Lens Recommendations
The Z 14-24mm f/2.8 S is the go-to ultra-wide for landscapes and seascapes — exceptional corner-to-corner sharpness and perfect for dramatic foreground-to-sky compositions. The Z 24-120mm f/4 S is an excellent all-rounder for travel landscapes.
🎛️ Program Mode
Manual mode gives you the most control over your look and exposure. Aperture Priority also works well — just watch that your shutter speed doesn't drop too low and introduce unwanted blur in moving elements like trees, water, or people.
🎯 Focus Settings
Use Single Point focus or Manual Focus for precise placement. Focus at the hyperfocal distance for maximum depth of field front to back — use the DoF Calculator in this app to find the right distance for your focal length and aperture.
⚡ Shutter Speed
On a tripod, shutter speed becomes a creative tool. Use it for long exposures to blur water and clouds, or faster speeds to freeze crashing waves. Balance with your aperture and ISO to achieve correct exposure — then adjust for the creative effect you want.
📷 Aperture
f/8–f/11 is the sweet spot for landscapes — excellent depth of field without diffraction softening. Go to f/13–f/16 if you have a very close foreground element and need the extra depth. Avoid f/22 — diffraction is clearly visible on the Z9's 45.7MP sensor.
🔆 ISO
Keep ISO at base (64) whenever possible — the Z9's base ISO 64 delivers exceptional dynamic range and clean shadows, perfect for recovering detail in high-contrast landscape scenes. Only raise ISO in low light when you need a faster shutter speed to freeze movement.
📹 Long Exposure
Disable IBIS when shooting on a stable tripod — at slow shutter speeds, IBIS can introduce micro-shake trying to correct movement that isn't there. Use the built-in 2-second self-timer or an electronic shutter cable to eliminate vibration from pressing the button.
🌙 Low Light / Golden Hour
During golden and blue hour, light changes fast. Switch to Auto ISO with a moderate ceiling (800–1600) to maintain your chosen aperture and creative shutter speed as the light fades. Enable Long Exposure NR off if you're shooting quickly between frames.
Quick Reference
Mode: M or A · Aperture: f/8–f/11 · Shutter: as needed for creativity · ISO: 64 base · AF: Single Point or MF at hyperfocal · Drive: Single frame · IBIS: OFF on tripod · VR: OFF on tripod
⚽ Sports Settings
Sports and Wildlife settings are very similar — both require fast action capture. See the Z9-specific burst mode settings below.
📸 Focal Length
For sports photography you generally want focal lengths between 70mm–600mm depending on your distance from the action and the sport.
- 70–200mm: Ideal for closer sports like basketball, tennis, or field sports where you have good access
- 200–400mm: Works great for most field sports like soccer, rugby, or American football from the sidelines
- 400–600mm+: Better for sports where you are further from the action — motorsports, cricket, or athletics
Lens Recommendations
The Z 70-200mm f/2.8 S is the ideal versatile sports lens. For longer reach the Z 100-400mm f/4.5-5.6 VR S is excellent. For maximum performance at distance the Z 400mm f/2.8 TC VR S (with built-in 1.4× teleconverter) is outstanding.
🎛️ Program Mode
Shutter Priority (S) or Manual (M) with Auto ISO. Manual + Auto ISO is ideal — you set the creative exposure and the camera handles ambient changes automatically.
🎯 Focus Settings
Use AF-C with People subject detection. Use Wide Area (L) as your default area mode with the Boosted Subject Detection system — press Fn1 to instantly engage 3D tracking when you need to follow a player around the frame.
⚡ Shutter Speed
1/500s–1/2000s to freeze action — adjust based on the speed of the sport. Soccer and rugby: 1/1000s+. Motorsport: 1/2000s+. For creative panning shots to show motion blur: 1/60s–1/125s.
📷 Aperture
f/2.8–f/5.6 — as wide as your lens allows for faster shutter speeds and to separate the subject from the background. The Z9's subject detection works beautifully at wide apertures where the subject pops from a blurred background.
🔆 ISO
Set Auto ISO with your pre-tested maximum (typically 6400–12800 for sports). A sharp image at high ISO is always better than a blurred image at low ISO. The Z9 handles high ISO very well.
📸 Burst Mode
Use CH (20fps in RAW) for professional sports work, or C30 for maximum speed with good quality. Enable Pre-Release Capture for critical moments — the camera saves 1 second of frames before you fully press the shutter.
Pro Tips
• Pre-focus on a spot where the action will happen — goal mouth, finish line, jump take-off point
• Use CFexpress Type B in both slots for maximum buffer performance
• Set IBIS to Sport mode — reduces EVF judder during burst shooting
• Enable VR Sport mode to stabilise the viewfinder between frames
• Use CFexpress Type B in both slots for maximum buffer performance
• Set IBIS to Sport mode — reduces EVF judder during burst shooting
• Enable VR Sport mode to stabilise the viewfinder between frames
Quick Reference
Mode: S or M+Auto ISO · Aperture: f/2.8–f/5.6 · Shutter: 1/1000s+ · ISO: Auto (max 12800) · AF: AF-C + Wide Area (L) + People detection · Drive: CH 20fps or C30 · IBIS: Sport mode
🦅 Wildlife Settings
📸 Focal Length
For wildlife photography you generally want focal lengths between 200mm–800mm depending on the subject and how close you can get.
- 200–400mm: Works for larger wildlife or when you can get relatively close — tamer safari scenarios, large animals in open ground
- 400–600mm: The sweet spot for most wildlife, giving you excellent reach while remaining handheld-friendly
- 600–800mm+: For distant subjects, shy or small animals, or bird photography where you need maximum reach
Lens Recommendations
The Z 100-400mm f/4.5-5.6 VR S covers nearly every scenario and is light enough to handhold all day. The Z 600mm f/6.3 VR S is outstanding for birds — surprisingly compact. For maximum performance the Z 800mm f/6.3 VR S pairs brilliantly with the Z9's bird detection. Remember the Z9 has plenty of resolution — you can also crop in DX mode for extra reach.
🎛️ Program Mode
Manual (M) with Auto ISO is my preference — you set the minimum shutter speed to freeze action and the camera handles exposure changes as the light shifts. Shutter Priority (S) also works well.
🎯 Focus Settings
AF-C with Bird or Animal subject detection. Use Wide Area (L) as your default AF area mode. Engage the Boosted Subject Detection system — hold Fn1 + AF-ON to instantly 3D track your subject across the full frame when they start moving fast or erratically.
⚡ Shutter Speed
1/500s+ for most stationary or slow-moving wildlife. 1/1000s–1/2000s for birds in flight and fast-moving animals. In very low light, you may have to compromise — a slightly motion-blurred subject at low ISO is often preferable to a frozen but extremely noisy one.
📷 Aperture
f/2.8–f/5.6 depending on your lens and how much depth of field you want. Wider apertures separate the animal from the background beautifully but require more precise focus. f/5.6–f/8 gives slightly more margin for error in focus placement while still rendering nice bokeh at these focal lengths.
🔆 ISO
Use Auto ISO with your pre-tested maximum (12800–25600 for the Z9). Wildlife light changes rapidly and constantly — Auto ISO keeps you shooting without missing shots while adjusting camera settings. The Z9's high-ISO performance is excellent.
📸 Burst Mode & Z9 Advantages
Use C30 (30fps RAW) for the best balance of speed and image quality. Enable Pre-Release Capture with 1 second buffer — the camera saves frames before you press the shutter, so bird takeoffs and predator strikes are captured even when you react slightly late.
🔭 DX Crop for Extra Reach
Switch to DX crop mode for an instant 1.5× reach boost — turn a 600mm into an effective 900mm with 19.4MP still available. Invaluable for distant or small birds.
Quick Reference
Mode: M+Auto ISO · Aperture: f/2.8–f/5.6 · Shutter: 1/1000s+ (birds) · ISO: Auto (max 12800–25600) · AF: AF-C + Bird/Animal detection + Wide Area (L) · Drive: C30 RAW · Pre-Release: 1 second · IBIS: Sport mode
🌙 Low Light Settings
Applies to any genre shot in challenging lighting — indoor events, concerts, night photography, dawn and dusk. The Z9's -9EV AF sensitivity and excellent high-ISO performance make it one of the best cameras available for low light work.
🎛️ Program Mode
Aperture Priority (A) or Manual (M) depending on the scene. For events and portraits use M + Auto ISO for maximum control. For static scenes use A or M with a fixed ISO.
🎯 Focus Settings
AF-S for stationary subjects in very low light — the camera takes its time to confirm focus. AF-C for moving subjects. The Z9 can autofocus down to -9EV which is near complete darkness — remarkable performance that makes most other cameras look limited. Enable the AF Assist Illuminator for dark indoor situations.
⚡ Shutter Speed
Balance between freezing subject movement and gathering enough light. Use IBIS to help stabilise — the Z9's 6-stop IBIS allows you to shoot handheld at much slower shutter speeds than would otherwise be possible. A rough guide:
- Stationary subjects: As slow as 1/15s–1/60s handheld with IBIS on 50mm or wider
- Walking subjects: 1/125s minimum
- Moving subjects: 1/500s+ to freeze motion
- Night landscapes on tripod: Any speed — use extended shutter speeds up to 900s
📷 Aperture
Use the widest aperture available — f/1.2, f/1.4, f/1.8, or f/2.8 — to gather maximum light. Every stop of extra aperture doubles the light reaching the sensor, directly reducing how much ISO you need. Wide apertures also give beautiful subject separation in low light.
🔆 ISO
This is where you'll need to push ISO. Set Auto ISO with your pre-tested maximum. The Z9 handles high ISO excellently — ISO 6400 is clean, 12800 is very usable, and 25600 is acceptable for events where getting the shot matters most. A sharp, slightly noisy image is always better than a blurred, clean one.
💡 Low Light Tips Specific to the Z9
The Z9's -9EV AF sensitivity is exceptional — in near darkness, switch to AF-S, place a single focus point on your subject, and hold the AF-ON button. It will find focus where other cameras give up entirely.
Flash in Low Light
Using flash in TTL mode is an excellent option for events and portraits in low light. The camera automatically balances the flash output with the ambient exposure — you get natural-looking fill light without blowing out your subject. For more subtle results, set flash exposure compensation to -0.7 to -1.3 EV.
Quick Reference
Mode: M+Auto ISO or A · Aperture: Widest available (f/1.2–f/2.8) · Shutter: As fast as subject needs · ISO: Auto (max 6400–25600) · AF: AF-S or AF-C · IBIS: Normal mode · AF Sensitivity: -9EV capable
⚠️ Common Mistakes to Avoid
The Z9 is a complex camera and these are the easy-to-make errors that catch photographers out — even experienced ones.
Long Exposure NR Left ON During Timelapse
Long Exposure NR takes a dark-frame exposure after every shot longer than 1 second, effectively doubling your interval time. Always turn it OFF before starting a timelapse.
Menu → Photo Shooting Menu → Long Exposure NR → OFF
VR Left ON When Using a Tripod
At slow shutter speeds on a stable tripod, VR can introduce micro-shake as it tries to correct movement that isn't there. Turn VR off for any tripod shots under 1/30s.
Expecting RAW at C120 / C60 Burst
The Z9's fastest burst modes (C60, C120) only support JPEG — not RAW or HEIF. If you need RAW, use CH (up to 20fps) or C30 instead.
Wrong Flicker Frequency
Flicker Reduction must match your local mains frequency: 50Hz in Europe/Ireland/UK/Australia, 60Hz in USA/Canada/Japan. Wrong setting = more banding, not less.
Menu → Photo Shooting Menu → High-Frequency Flicker Reduction → 50Hz or 60Hz
Shooting JPEG When You Meant RAW
Easy to accidentally change after borrowing the camera or after using a high-speed burst mode. Check QUAL setting at the start of every important shoot.
Memory Banks Overwriting Your Settings
Memory Banks A/B/C/D auto-save any setting changes you make. If you tweak something mid-shoot thinking it's temporary, it overwrites the bank. Save your banks to the memory card after setup — if a bank gets accidentally changed, reload from your saved file to restore everything instantly.
No Card in Camera / Wrong Slot
The Z9 will shoot without a card by default (to a buffer that isn't saved). Always check both CFexpress slots are loaded before a paid shoot. Set it to lock shutter release without a card: Custom Settings → d → d6 (or via Setup).
Not Formatting Cards in Camera
Always format CFexpress cards inside the Z9, not on a computer. Computer formatting uses a different filesystem that can cause errors or compatibility issues.
GPS Taking Ages to Lock
The first GPS fix of the day takes 1–2 minutes in open sky. Turn the Z9 on outside while you're preparing your kit — by the time you're ready to shoot, GPS will have locked.
Touching the Touchscreen While Shooting
Accidental touch AF moves your focus point without you realising. If this happens often, disable touch AF: Custom Settings → f4 Touch Controls → Touch Shooting → OFF.
🔧 Trouble Shooting
Looking for troubleshooting help? We have a dedicated section for it.
Advanced Z9 Features
These features separate the Z9 from simpler cameras. Master them to get the absolute most out of your investment.
Button Customisation
The Z9's buttons are extensively customisable. Assign the functions you use most to the buttons most accessible to your shooting style.
Menu → Custom Settings Menu (pencil icon) → f Controls → f2 Custom Controls (Shooting)
📸 Kieran's Recommended Custom Controls
Fn1 (Front): Focus Area Mode switch — cycle AF areas quickly
Fn2 (Back): Subject Detection toggle — quickly switch detection type
Fn3: Image Quality — quickly switch RAW/JPEG
Depth of Field Preview: Preview or assign to another function
AF-ON: AF-ON only (back button focus)
Portrait AF-ON: Same — AF-ON for vertical shooting
Fn2 (Back): Subject Detection toggle — quickly switch detection type
Fn3: Image Quality — quickly switch RAW/JPEG
Depth of Field Preview: Preview or assign to another function
AF-ON: AF-ON only (back button focus)
Portrait AF-ON: Same — AF-ON for vertical shooting
Memory Banks (A, B, C, D)
Memory Banks let you save different shooting configurations that you can instantly switch between. The Z9 has four banks (A, B, C, D) each storing: shooting menu settings, Custom Settings, and exposure settings.
Menu → Photo Shooting Menu → Extended Menu Banks → ON
Enable extended menu banks so each bank stores its own independent shooting mode, giving fully separate configurations.
📸 Suggested Bank Assignments
Bank A: Wedding / events — AF-C, People detection, CL 5fps, Auto ISO
Bank B: Wildlife / sport — AF-C, Bird detection, C30, high ISO ceiling
Bank C: Landscape / studio — AF-S, Single Point, low ISO, manual WB
Bank D: Video — your video configuration
Bank B: Wildlife / sport — AF-C, Bird detection, C30, high ISO ceiling
Bank C: Landscape / studio — AF-S, Single Point, low ISO, manual WB
Bank D: Video — your video configuration
⚠️ Live Update Warning
By default, any setting change you make is automatically saved to the current bank. This means changing settings mid-shoot updates the bank immediately. To prevent accidental changes, save your banks to the memory card after setup so you can always reload your exact configuration.
Custom Settings Banks A, B, C & D
Just like the Shooting Menu Banks, the Custom Settings Menu (the pencil icon) has its own set of four banks — A, B, C, and D. Each bank stores a completely independent set of custom settings covering button assignments, autofocus behaviour, metering, timers, and controls. Switching banks instantly changes how the entire camera behaves without touching a single setting manually.
📌 How to Switch Custom Settings Bank
Menu → Custom Settings Menu (pencil icon) → top of list → Custom Settings Bank → select A, B, C or D
⚡ Custom Settings Banks vs Shooting Menu Banks
These are two separate bank systems that work independently of each other.
- Shooting Menu Banks (A–D) — store photo shooting settings: image quality, ISO, white balance, metering, focus mode, burst speed etc. Located in the Photo Shooting Menu (camera icon).
- Custom Settings Banks (A–D) — store how the camera behaves: button assignments, AF response, timers, flash sync speed, dial behaviour etc. Located in the Custom Settings Menu (pencil icon).
You can be on Shooting Bank A and Custom Settings Bank B at the same time — they are completely independent. However if you enable Extended Menu Banks, they link together so switching one bank switches both.
Menu → Photo Shooting Menu (camera icon) → Extended Menu Banks → ON
What Custom Settings Banks Store
a — Autofocus Settings
AF-C and AF-S priority, focus tracking sensitivity, AF activation, subject detection options, AF-area mode restrictions, and manual focus ring behaviour. Useful if you want one bank optimised for moving subjects and another for still subjects.
Custom Settings Menu → a Autofocus
b — Metering/Exposure
ISO step value, exposure compensation step, easy exposure compensation, matrix metering face detection, and exposure fine-tuning. Handy if you want different exposure increment steps for different shooting styles.
Custom Settings Menu → b Metering/Exposure
c — Timers/AE Lock
Shutter-release AE-L behaviour, self-timer settings, monitor and viewfinder power-off delays. Great for saving battery in one bank while keeping the camera always-on in another for fast action.
Custom Settings Menu → c Timers/AE Lock
d — Shooting/Display
Beeps, viewfinder/monitor display options, exposure delay mode, pre-release capture, zebra highlights, viewfinder display size, and sensor shield behaviour. One of the largest groups — store completely different display configurations per bank.
Custom Settings Menu → d Shooting/Display
e — Bracketing/Flash
Flash sync speed, flash shutter speed, flash exposure compensation behaviour, and auto bracketing settings. Store a studio flash bank with specific sync speeds separate from your outdoor natural light bank.
Custom Settings Menu → e Bracketing/Flash
f — Controls
The most important group — all button and dial assignments for every physical control on the camera: Fn1, Fn2, Fn3, Fn4, AF-ON, sub-selector, shutter button, command dials, multi-selector, and lens control ring. Switching banks here completely remaps your camera controls. This is where Custom Settings Banks become most powerful.
Custom Settings Menu → f Controls
g — Movie
All video-specific custom settings including AF behaviour during recording, button assignments for video, power aperture, zebra display, and monitor mode settings. Store a dedicated video bank without affecting your photo shooting banks.
Custom Settings Menu → g Movie
A Practical Example Setup
- Bank A — Portraits: AF-S priority, slower AF tracking sensitivity, softer beep, button layout optimised for portrait shooting
- Bank B — Landscapes: minimal AF customisation, timers set to save battery during long tripod sessions, display settings adjusted for careful composition
- Bank C — Sports or Wildlife: aggressive AF-C tracking sensitivity, back-button focus layout in group f, fast power-off timers to keep camera always ready
- Bank D — Low Light Sports or Wildlife: same aggressive AF-C tracking as Bank C but with adjusted exposure and metering behaviour in group b for difficult low light conditions
💾 Always Save Before Switching or Editing
Custom Settings changes are saved immediately and there is no undo. Save your full settings to a card before experimenting with a new bank configuration.
Menu → Setup Menu (wrench icon) → Save/Load Settings → Save Settings
🔄 Renaming Your Banks
You can rename each Custom Settings Bank (up to 20 characters) to remind yourself what each one is set up for — much easier than remembering what Bank C was for.
Menu → Custom Settings Menu (pencil icon) → Custom Settings Bank → select bank → Rename
Recall Shooting Position (Focus Memory)
Save a specific focus distance and recall it instantly by pressing a button. Useful for sports photographers who pre-focus on a specific spot (goal line, podium) and need to return to that exact focus distance instantly.
Menu → Custom Settings Menu (pencil icon) → a Autofocus → a10 Recall Shooting Position
Store up to 5 focus positions. Assign recall to a customisable button. Press and hold to store; press to recall.
Auto Capture
Auto Capture lets the Z9 trigger itself automatically based on subject detection, motion detection, or interval. Set it up and the camera shoots without you touching the shutter — hands-free photography at its most advanced.
Menu → Photo Shooting Menu (camera icon) → Auto Capture
Configure trigger type: subject detection (fires when a bird/animal/person enters the frame), motion detection, or a combined approach. Set burst length and sensitivity.
💡 Use Cases for Auto Capture
• Remote wildlife photography — set camera near a feeding spot, walk away
• Bird hide photography — mount camera on a fixed rig, let it detect and shoot
• Trail camera replacement — the Z9 quality is far beyond any trail cam
• Self-portraits / video — fires when you enter the frame
• Bird hide photography — mount camera on a fixed rig, let it detect and shoot
• Trail camera replacement — the Z9 quality is far beyond any trail cam
• Self-portraits / video — fires when you enter the frame
Pre-Release Capture (Pre-Burst)
Pre-Release Capture is one of the Z9's most extraordinary features. The camera continuously buffers images before you fully press the shutter. When you take the shot, it includes up to 1 second of frames captured before your finger fully pressed the button.
For wildlife and sports photography, this means you can never miss the decisive moment. Even if you press slightly late, the pre-capture buffer saves the shot.
Z9 FEATURE Enable Pre-Release Capture
Menu → Photo Shooting Menu (camera icon) → Pre-Release Capture
Set the pre-capture duration (0.3s or 1s before shutter press). Works in C30, C60, C120 burst modes. Requires JPEG or HEIF image quality.
🦅 Perfect for Birds in Flight
Set C120 burst with 1 second pre-release capture. When a bird takes off or a predator strikes, you'll have the complete moment even if you were a fraction late pressing the shutter. Game-changing for wildlife.
Pixel Shift Multi-Shot
Pixel Shift captures four images (or 16 for high resolution mode) with the sensor shifted by one pixel between each shot. The result is a composite image with dramatically increased resolution and colour accuracy — excellent for studio, product, and landscape photography.
Menu → Photo Shooting Menu (camera icon) → Pixel Shift Multi-Shot
Requires a tripod and still subject. Motion between frames causes artefacts. Process the resulting files in Capture NX-D or compatible software.
⚠️ Requirements
Absolutely requires a rock-solid tripod and stationary subject. Even leaf movement in a landscape can cause colour fringing. Best for architecture, products, jewellery, fine art reproduction.
Interval Timer / Timelapse
The Z9 has a built-in interval timer for creating timelapse sequences without any external trigger or software. Configure start time, interval between shots, total number of intervals, and shots per interval.
Menu → Photo Shooting Menu (camera icon) → Interval Timer Shooting
1. Choose Start Day/Time: Now or a specific scheduled time
2. Interval: Time between shots (from 1 second to 24 hours)
3. Number of Intervals: How many shots total (1–9999)
4. Shots per Interval: Usually 1, but can take multiple
5. Exposure Smoothing: Turn ON — prevents flicker as light changes
6. Start: Press OK to begin
2. Interval: Time between shots (from 1 second to 24 hours)
3. Number of Intervals: How many shots total (1–9999)
4. Shots per Interval: Usually 1, but can take multiple
5. Exposure Smoothing: Turn ON — prevents flicker as light changes
6. Start: Press OK to begin
⏱️ Interval Reference Guide
Fast-moving clouds: 3–5 seconds
Slow clouds / sunset / sunrise: 5–8 seconds
Stars / Milky Way: 25–30 seconds (allows long exposures)
Traffic / city life: 1–2 seconds
Construction: 1–5 minutes
Plants growing: 5–30 minutes
Slow clouds / sunset / sunrise: 5–8 seconds
Stars / Milky Way: 25–30 seconds (allows long exposures)
Traffic / city life: 1–2 seconds
Construction: 1–5 minutes
Plants growing: 5–30 minutes
🎬 How Many Shots Do You Need?
Formula: (desired video length in seconds) × (frame rate) = total shots
10-second clip at 25fps: 250 shots
30-second clip at 25fps: 750 shots
60-second clip at 25fps: 1500 shots
10-second clip at 25fps: 250 shots
30-second clip at 25fps: 750 shots
60-second clip at 25fps: 1500 shots
💡 Kieran's Timelapse Tips
• Always enable Exposure Smoothing — prevents flicker, especially at dusk/dawn
• Manual mode gives most consistent exposure throughout a timelapse
• Tripod is essential — any movement completely ruins it
• Lock your focus before starting — switch to MF after confirming focus
• Use an AC adapter or fully charged EN-EL18d for long sessions
• Test first! Take 10–20 shots manually before committing to a long sequence
• JPEG is fine for timelapse — saves card space without quality penalty
⚠️ Important Reminders
• The camera locks during interval shooting — you can't change settings
• Calculate card space needed before starting — 1500 RAW files is a lot
• Protect from weather for outdoor sessions
• The camera will stop if the card fills up
• Calculate card space needed before starting — 1500 RAW files is a lot
• Protect from weather for outdoor sessions
• The camera will stop if the card fills up
Post-Processing Software
After shooting, import the image sequence into: Adobe Premiere / Final Cut Pro / DaVinci Resolve (free) — import as an image sequence to create the final video.
Multiple Exposure
Multiple Exposure lets the Z9 combine 2–10 separate exposures into a single final image in-camera. Unlike compositing in post, you can see a live preview overlay of previous frames while composing each new one — making creative double exposures achievable entirely in-camera.
Menu → Photo Shooting Menu (camera icon) → Multiple Exposure
1. Multiple Exposure Mode: On (Series) or On (Single Photo)
2. Number of Shots: 2–10 exposures to combine
3. Overlay Mode: Choose how frames are blended (see below)
4. Save Individual Images: ON to keep each frame plus the composite
2. Number of Shots: 2–10 exposures to combine
3. Overlay Mode: Choose how frames are blended (see below)
4. Save Individual Images: ON to keep each frame plus the composite
Overlay Modes
Add
Each exposure's brightness is added together. Bright areas accumulate. Best for star trails, light painting, fireworks — use with low exposure on each shot.
Average
Each frame contributes equally, averaged together. Reduces noise dramatically — like in-camera long-exposure noise reduction. Good for smooth water or skies.
Light
Only the brightest pixels from each frame survive. Dark backgrounds disappear, bright subjects remain. Perfect for fireworks against a night sky or creative double exposures on dark backgrounds.
Dark
Only the darkest pixels survive. The opposite of Light mode. Useful for creative silhouette combinations.
📸 Creative Multiple Exposure Ideas
Portrait + Texture: Average or Light mode — portrait first, then abstract texture or leaves
Fireworks: Light mode — each burst adds to the composition automatically
Light Painting: Add mode — each painted stroke accumulates in darkness
Moon Composite: Light mode — landscape first, then reposition and shoot moon separately
Fireworks: Light mode — each burst adds to the composition automatically
Light Painting: Add mode — each painted stroke accumulates in darkness
Moon Composite: Light mode — landscape first, then reposition and shoot moon separately
💡 Tips for Better Multiple Exposures
• Enable Save Individual Images — keep each frame in case the composite isn't what you expected
• Use the live overlay preview to precisely align your second frame over the first
• For portraits: underexpose each shot by 1 stop, then use Average mode for a natural result
• Use a tripod for precise alignment of static compositions
• RAW format is available — full editing flexibility on the final composite
⚡ Flash Photography — Complete Guide
Flash photography opens up a whole world of creative control. Understanding how to use it properly — not just pointing a flash at your subject — separates snapshots from truly professional images. The Z9's electronic shutter removes the traditional X-sync speed limitation, giving you more flash freedom than almost any other camera.
The Golden Rule — Two Separate Exposures
Every flash photo contains two completely separate exposures happening simultaneously. Understanding this is the key to mastering flash:
Ambient Exposure (background)
Controlled by your aperture + shutter speed + ISO. This is your natural background exposure — sky, room, environment. Shutter speed is the primary tool for controlling how bright or dark the background is when using flash.
Flash Exposure (subject)
Controlled by flash power + distance + aperture. This lights your subject. Shutter speed has almost no effect on flash exposure (the flash fires in 1/1000s or faster regardless of your shutter speed). ISO affects both exposures equally.
💡 The Practical Takeaway
Shutter speed = controls background brightness (within sync limits)
Aperture = controls subject brightness AND depth of field
Flash power = fine-tunes subject brightness independently
ISO = affects both subject and background equally
Aperture = controls subject brightness AND depth of field
Flash power = fine-tunes subject brightness independently
ISO = affects both subject and background equally
Flash Modes Explained
TTL (Through The Lens)
The camera fires a pre-flash, measures the reflected light, and automatically calculates the correct flash power. Fast, reliable, and adjustable with flash exposure compensation (±3 EV). The best starting mode for most photographers.
Manual Flash
You set the flash power yourself — full (1/1), half (1/2), quarter (1/4), etc. No pre-flash surprises. Perfect for studio work, product photography, and any situation where you want absolute consistency across a series of shots.
TTL-BL (Balanced Fill Flash)
A Nikon-specific TTL mode that balances flash output with the ambient light to create a natural-looking fill rather than an obviously flash-lit image. Excellent for outdoor portraits where you want subtle fill without looking like you've used flash.
Slow Sync
Uses a slower shutter speed with flash to allow more ambient light to register in the background, giving a more natural, balanced look. Useful for indoor events where you want to show room atmosphere rather than a black background.
Rear Curtain Sync
The flash fires at the end of the exposure rather than the beginning. When combined with slow shutter speeds, motion blur trails appear behind a moving subject rather than in front of it — much more natural-looking.
The Inverse Square Law
The Inverse Square Law is the single most important concept in flash photography. It states that light intensity decreases by the square of the distance. In plain English: if you double the distance between your flash and subject, you don't lose half the light — you lose three quarters of it.
📐 Inverse Square Law in Practice
Subject at 1m: Full power (reference point)
Subject at 2m: ¼ of the light (2 stops less)
Subject at 3m: 1/9 of the light (3.2 stops less)
Subject at 4m: 1/16 of the light (4 stops less)
This is why moving a flash just a metre or two makes a dramatic difference. It's also why large softboxes close to a subject produce such beautiful, soft light — the rapid light falloff creates a very gradual shadow edge.
💡 How the ISL Changes Your Shooting
Background separation: Move your flash close to your subject and the background drops into darkness quickly — great for dramatic portraits.
Even group lighting: Move the flash further back from a group so the ISL falloff is less steep — the difference in light between the front and back rows becomes less extreme.
Softbox quality: A large softbox placed close creates very soft, gradual shadows because of rapid ISL falloff. The same softbox placed far away becomes harder and more directional.
High-Speed Sync (HSS) — Flash at Any Shutter Speed
The Z9's electronic shutter means it has no mechanical X-sync limit. With HSS-capable flashes, you can sync at any shutter speed up to 1/8000s. This is invaluable for outdoor flash photography where you need a fast shutter to control bright ambient light.
SETUP Enable HSS
Menu → Custom Settings Menu (pencil icon) → e Bracketing/Flash → e1 Flash Sync Speed → 1/200s (Auto FP)
The Z9 automatically activates HSS when your shutter speed exceeds the standard sync speed with a compatible flash attached.
⚡ HSS Power Loss by Shutter Speed
HSS fires the flash as a continuous burst rather than a single pop — this costs you power. The faster you go, the more you lose:
1/500s: ~1 stop loss
1/1000s: ~1.5–2 stops loss
1/2000s: ~2–2.5 stops loss
1/4000s: ~2.5–3 stops loss
1/8000s: ~3–4 stops loss
Stay at 1/500s–1/1000s when possible. Only push faster if you genuinely need it to control a very bright background.
1/500s: ~1 stop loss
1/1000s: ~1.5–2 stops loss
1/2000s: ~2–2.5 stops loss
1/4000s: ~2.5–3 stops loss
1/8000s: ~3–4 stops loss
Stay at 1/500s–1/1000s when possible. Only push faster if you genuinely need it to control a very bright background.
- Use wide apertures outdoors (f/1.4–f/2.8) with flash for beautiful background blur
- Overpower sunlight to create dramatic, lit portraits in full daylight
- Freeze fast action with flash in bright conditions
- Create rim-lit or hair-light separation portraits in full sun
Flash Exposure Compensation
Flash Exposure Compensation (FEC) adjusts the flash power in TTL mode without changing your ambient exposure. Use it to fine-tune how much flash light hits your subject relative to the background.
-0.3 to -1.0 EV
Subtle, natural-looking fill flash. Subject looks naturally lit — you wouldn't necessarily know flash was used. Great for outdoor portraits with gentle fill to open up shadows.
0 EV (neutral)
Camera's TTL calculation. Usually slightly bright for portraits — the camera tries to give you a technically correct exposure which can look a little flat.
+0.3 to +1.0 EV
More prominent, powerful flash. Useful in bright sunlight when you want the flash to clearly overpower ambient and create a clean lit look.
📸 Starting Point for Flash Compensation
For natural-looking fill flash outdoors, start at -0.7 EV FEC. The flash lifts the shadows without looking artificial. Adjust from there based on the ratio you want between ambient and flash.
Compatible Flashes for the Z9
Nikon SB-5000
Nikon's flagship Speedlight. Radio-controlled AWL, full HSS, excellent TTL. The benchmark for Nikon flash performance.
Godox V1-N / V860III-N
Excellent third-party TTL/HSS options with built-in radio triggering. Very popular for their value and the wide Godox ecosystem of modifiers and triggers.
Godox AD200 Pro
Compact battery-powered monolight. 200Ws output in a pocket-sized form factor. Excellent for location portrait and event work.
Profoto A10 / A2
Premium compact flash with superb colour accuracy and the Profoto ecosystem. Air TTL compatible with the Z9 via the Profoto Air Remote.
💡 No HSS Flash? Use an ND Filter
If your flash doesn't support HSS, a 3–6 stop ND filter on the lens lets you slow the ambient exposure down to within standard sync speed while still using wide apertures outdoors. A 6-stop ND at ISO 100 in bright sun typically brings you into the 1/100s–1/200s range.
Video Recording — Heat Management
The Z9 has significantly improved video recording time limits compared to many mirrorless cameras. With standard settings in moderate temperatures, the Z9 can record video for extended periods.
Recording Time Limits
The Z9 can record for up to 125 minutes continuously in standard conditions. In hot weather or when shooting 8K RAW, times will be shorter. Using faster CFexpress cards (which generate less heat from write activity) can help maintain longer recording times.
⚠️ If the Camera Gets Hot
• Stop recording and allow the camera to cool
• Remove cards and battery briefly if needed
• Use an external monitor/recorder to offload processing heat
• Keep the camera out of direct sunlight when recording
• Use faster CFexpress cards to reduce card write heat
• Swap cards periodically — cards absorb and store heat
• A camera cage helps dissipate heat away from the body
🔧 Camera Maintenance
Regular maintenance keeps your Z9 performing at its best and prevents issues from developing over time.
Pixel Mapping
Menu → Setup Menu (wrench icon) → Pixel Mapping → Press OK
Scans the sensor for any hot or dead pixels and maps them out so they don't appear in your images. Run this every 6 months or if you notice a fixed bright or dark spot appearing in all your images. Takes only a few seconds. Dead pixels are more noticeable in video than stills.
Automatic Sensor Cleaning
Menu → Setup Menu (wrench icon) → Clean Image Sensor → Clean at Startup/Shutdown
The Z9 vibrates the sensor to shake off dust particles. Enable cleaning at both startup and shutdown for best results. This doesn't replace manual sensor cleaning but significantly reduces how often you need it.
Manual Sensor Cleaning
Menu → Setup Menu (wrench icon) → Clean Image Sensor → Clean Now
Locks the mirror up (or in the Z9's case holds the shutter open) for manual sensor cleaning with a blower. Never touch the sensor directly — use a rocket blower first, then wet swabs only if necessary. Always use the camera on AC power or a fully charged battery for sensor cleaning.
Check for Sensor Dust
To check for dust spots: shoot a clear bright sky or white wall at f/16, manually focused to infinity. Review the image at 100% zoom — any dust spots will appear as soft dark circles. Spot them now rather than discovering them during a paid shoot.
Image Dust Off Reference Photo
Menu → Setup Menu (wrench icon) → Image Dust Off Ref Photo
Shoots a reference frame used by Capture NX-D to automatically remove dust spots from images in post-processing. Update this after every sensor cleaning session.
💡 Sensor Cleaning Tips
• Always use the Z9's sensor shield — it dramatically reduces dust ingress during lens changes
• Change lenses with the camera pointing downward so dust falls away from the sensor
• A rocket blower solves 90% of dust issues without any risk of scratching
• If dust remains after blowing, use professional wet sensor swabs (Visible Dust or similar)
• For critical commercial work, have the sensor professionally cleaned once a year
Save / Load Camera Settings
Save your complete camera configuration to a CFexpress card. Restore it instantly after a factory reset, camera replacement, or to clone settings to another Z9.
Save Settings to Card
Menu → Setup Menu (wrench icon) → Save/Load Settings → Save Settings
Creates a settings file on your card. Do this after any major configuration session. Do this before every firmware update.
Load Settings from Card
Menu → Setup Menu (wrench icon) → Save/Load Settings → Load Settings
Restores all saved settings. After a factory reset or when setting up a new Z9, load your saved configuration instantly.
Electronic Shutter — What It Means for the Z9
The Z9 is unique: it has no mechanical shutter at all. Every exposure is made electronically — the sensor simply starts and stops reading. This is not a compromise but a deliberate design choice that enables features no mechanical shutter camera can match.
What You Gain
Complete Silence
Zero shutter sound. Truly silent operation for wildlife, ceremonies, courtrooms, theatre, and any situation where noise is unwanted or disruptive.
Zero Shutter Shock
Mechanical shutters cause micro-vibration at certain speeds (typically 1/30s–1/250s) that can subtly soften images, especially with telephoto lenses. The Z9 is immune to this entirely — every shot, at every shutter speed.
No Shutter Wear
Traditional shutters have a rated lifespan (typically 300,000–500,000 actuations). The Z9 has no mechanical shutter to wear out — it can fire indefinitely without concern about actuations.
120fps Burst
A mechanical shutter physically cannot cycle 120 times per second. The electronic shutter is what enables C120 burst mode — impossible on any mechanical shutter camera.
The One Trade-off: Rolling Shutter
Electronic shutters read the sensor from top to bottom, one row at a time. Very fast lateral motion — a speeding car panned at high speed, propeller blades, fast hand movements — can appear slightly distorted as the top of the frame is read a fraction before the bottom. This is called rolling shutter.
💡 Rolling Shutter on the Z9 in Practice
The Z9's stacked BSI sensor reads the entire frame incredibly fast — far faster than conventional mirrorless sensors. Rolling shutter artefacts are dramatically reduced and are not a practical concern for the vast majority of still photography. You would need to be panning extremely fast or photographing spinning propeller blades to see it.
Flash Sync & Electronic Shutter
The Z9's standard flash sync speed is 1/200s. Use HSS (High Speed Sync / Auto FP) to sync flash at faster shutter speeds. See the Flash & HSS section in this Advanced tab for full details.
📸 Banding Under Artificial Lights
The one real-world limitation of electronic shutter is banding under flickering artificial lights (LED, fluorescent, stadium lighting). Enable Photo Flicker Reduction and High-Frequency Flicker Reduction in the Photo Shooting Menu, and fine-tune shutter speed if banding persists. See the Troubleshooting section for detailed fixes.
🛠️ Z9 Troubleshooting
The most common Z9 problems and exactly how to fix them. Most have a simple solution once you know where to look.
📷 RAW Option Greyed Out / Camera Won't Shoot in RAW
This is one of the most common questions about the Z9. There are a few possible reasons:
⚠️ Burst mode is set to C30, C60, or C120
These High-Speed Frame Capture modes only work with JPEG and HEIF — RAW is not available at these frame rates. Reduce to 20fps or slower and RAW will become available again.
Hold Burst Mode button → rotate rear dial → select CH (20fps) or CL
⚠️ Pre-Release Capture is enabled
Pre-Release Capture also forces JPEG only. Disable it via the menu path below and RAW will be available again.
Menu → Custom Settings Menu (pencil icon) → d Shooting/Display → d3 Pre-Release Capture Options → Pre-Release Burst → OFF
💾 Images Captured as JPEGs Even Though RAW is Selected
Same reason as above — the burst or release mode was accidentally switched to C30, C60, or C120 during a shoot. Always check your release mode before an important job. Change to 20fps or lower and the camera reverts to RAW automatically as long as it's selected in the quality menu.
Hold Burst Mode button → rotate rear dial → select CH (20fps) or CL → RAW is restored
🖥️ RAW Files Won't Open on Mac or Windows
Mac — Apple Photos / Preview not opening Z9 RAW files
Apple only supports Lossless Compressed NEF natively. High Efficiency formats are not supported in Apple Photos or Preview. Switch RAW recording to Lossless Compressed, or use Lightroom, Capture One, Luminar Neo, or NX Studio instead.
Menu → Photo Shooting Menu → NEF (RAW) Recording → Lossless Compression
Windows — RAW thumbnails not showing in File Explorer
The NEF codec needs to be installed for Windows to display RAW previews. Download it free from Nikon's Download Centre at downloadcenter.nikonimglib.com — search for Z9 and install the NEF Codec. Alternatively use Lightroom, Capture One, or NX Studio to import directly.
Lightroom / software not recognising Z9 NEF files
Ensure your editing software is updated to a version that supports the Z9. Older versions of Lightroom may not recognise Z9 RAW files. Alternatively use Adobe's free DNG Converter to convert to the universal DNG format which any version supports.
🌑 RAW Files Look Dark or Flat in Lightroom
Active D-Lighting is enabled in your camera. Lightroom doesn't read this setting by default, so images look underexposed compared to the in-camera preview.
✅ Fix — Two options
In camera: Turn off Active D-Lighting
Menu → Photo Shooting Menu → Active D-Lighting → OFF
In Lightroom Classic: Go to Preferences → Presets → Raw Defaults → Camera Settings. This only applies to newly imported images — for already-imported shots select them and click Reset.
🌑 Photos Too Dark / Underexposed
Exposure compensation set negative
Check the +/- exposure compensation value — it's very easy to knock accidentally. Hold the EV button and rotate the rear dial to adjust back toward 0.
ISO too low for the light conditions
In low light, ensure Auto ISO is enabled with a generous maximum ceiling, or manually raise ISO. See the Auto ISO section in Settings.
Press the ISO button → rotate rear dial to adjust ISO sensitivity
Shutter speed too fast
In S or M mode if your shutter is too fast in low light, images will be underexposed. Slow down or widen the aperture.
Active D-Lighting too aggressive
Active D-Lighting can cause the camera to brighten shadows and affect overall exposure in unexpected ways. Reduce the strength or turn it off.
Menu → Photo Shooting Menu → Active D-Lighting → Off or Low
Metering mode wrong for the scene
If metering off a bright background, it underexposes the subject. Add positive exposure compensation (+1 to +2 EV), or switch to Spot Metering and meter off your subject directly.
i Menu → Metering → Spot Metering
☀️ Photos Too Bright / Overexposed
Exposure compensation set positive
Hold the EV button and rotate the rear dial to reduce back toward 0 or go negative.
Shutter speed too slow
Increase shutter speed to reduce the amount of light reaching the sensor, or close down aperture to a higher f-number like f/5.6 or f/8.
Active D-Lighting too aggressive
ADL can affect highlights. Reduce or turn off.
Menu → Photo Shooting Menu → Active D-Lighting → Off or Low
Metering set to wrong mode
Switch to Spot Metering and meter off the brightest part of the scene to protect highlights.
i Menu → Metering → Spot Metering
🚫 Shutter Won't Fire
No memory card inserted
The Slot Empty Release Lock is ON by default — the shutter won't fire without a card. This is a great safety feature. Always leave it ON.
Check both CFexpress slots have cards inserted
AF failing in focus-priority mode
In AF-S mode, the default is Focus Priority — the camera won't fire until focus is confirmed. In low light or on low-contrast subjects this prevents the shutter firing. Point at a higher-contrast area first, or switch to Release Priority.
Menu → Custom Settings Menu (pencil icon) → a Autofocus → a2 AF-S Priority Selection → Release
Buffer full
During high-speed burst the buffer can fill temporarily. Wait a moment while images write to the CFexpress card. Use faster Gen 4.0 cards to reduce wait time.
Silent Mode accidentally enabled
Silent Mode suppresses the shutter — and also the flash when accidentally enabled.
Menu → Setup Menu (wrench icon) → Silent Mode → OFF
📺 Banding / Horizontal Stripes in Images
Because the Z9 uses an electronic shutter only, it's susceptible to banding under certain artificial lighting conditions. This is the most discussed limitation of electronic shutter cameras.
Under LED or fluorescent lighting
Enable both Flicker Reduction settings. If banding persists, try small shutter speed adjustments — changing from 1/125s to 1/100s can eliminate it entirely. Every LED lighting system pulses differently, and the pulse frequency can change as lights get brighter or dimmer, so check frequently during a shoot.
Menu → Photo Shooting Menu → Photo Flicker Reduction → ON
Menu → Photo Shooting Menu → High-Frequency Flicker Reduction → ON
With flash in HSS mode
Some third-party flashes — especially older models or those with outdated firmware — can cause banding in HSS due to their pulsed output. Nikon SB-series speedlights are the most reliable. An alternative is to use an ND filter to keep ambient levels down so you can stay below 1/200s and avoid HSS entirely.
Menu → Custom Settings Menu → e Bracketing/Flash → e1 Flash Sync Speed → 1/200s (Auto FP)
At concerts and events with stage LED lighting
Visit the venue beforehand if possible and test with the lighting in use — a pre-event sound check is ideal for this. Enable High-Frequency Flicker Reduction for access to finer shutter speed increments, then adjust shutter speed slightly until banding disappears.
🔍 Images Are Soft or Blurry
VR left ON during tripod long exposures
The most common cause of soft long-exposure images on a tripod. VR actively hunts for vibration — on a stable tripod it introduces movement rather than reducing it. Always turn VR/IBIS OFF for any long exposures on a tripod.
Menu → Photo Shooting Menu → Vibration Reduction → OFF
Shutter speed too slow for subject movement
Motion blur from subject movement. Increase shutter speed — at least 1/focal length for stationary subjects, 1/1000s+ for fast action.
Shooting at very small apertures (f/16, f/22)
Diffraction softens images at very small apertures on a high-resolution sensor. Enable Diffraction Compensation, or stay at f/8–f/11 for landscapes.
Menu → Photo Shooting Menu → Diffraction Compensation → ON
AF not locking correctly
Check your focus mode (AF-C for moving subjects, AF-S for static). Check the AF area mode isn't grabbing the wrong element in the frame.
AF fine-tuning needed for a specific lens
If one particular lens consistently focuses slightly in front of or behind your subject, dial in a per-lens correction. See the AF Fine Tune section in the Focus tab.
Menu → Setup Menu (wrench icon) → AF Fine-Tune → ON → select lens and adjust
📸 VR Causing Jumpy Viewfinder During Burst Shooting
VR Normal mode recentres the stabilisation elements between each burst frame — this causes the image to jump around in the viewfinder. With longer focal length lenses this is very noticeable and can cause you to completely lose track of a fast-moving subject between frames.
✅ Fix
Switch to VR Sport mode for burst shooting. Sport mode doesn't recentre between frames, giving you a smooth, stable tracking view. This is the mode to use for 90% of action, wildlife, and sports shooting.
Menu → Photo Shooting Menu → Vibration Reduction → Sport
💡 Highlights Blowing Out / Inconsistent Exposure
Matrix metering overexposing bright scenes
Switch to Spot Metering and meter off the brightest part of the scene. This protects highlights and gives maximum dynamic range to recover shadows in post.
i Menu → Metering → Spot Metering
Inconsistent exposure across a burst under artificial lights
Under flickering LED or fluorescent lights the camera can catch different phases of the light cycle across burst frames, causing uneven exposures. Enable Flicker Reduction to sync exposures to the peak of the cycle.
Menu → Photo Shooting Menu → Photo Flicker Reduction → ON
💾 Memory Banks Changing Unexpectedly
Banks are live — they update automatically as you change any setting. There is no lock feature. If you accidentally change something, it overwrites the current bank immediately with no warning.
✅ Fix — Save your settings to card
Always save your settings to the memory card after configuring your banks. If a bank gets accidentally changed, reload from your saved file and you're back instantly.
Menu → Setup Menu (wrench icon) → Save/Load Settings → Save Settings
To restore: Menu → Setup Menu → Save/Load Settings → Load Settings
👆 Focus Point Jumping Around on Its Own
You're brushing the rear touchscreen while shooting with your eye to the viewfinder, and touchscreen AF is moving the focus point without you realising it. Extremely common when shooting vertically or when cheek pressure hits the screen.
✅ Fix
Disable touch shooting while keeping other touch functions active, or disable the touchscreen entirely.
Menu → Custom Settings Menu → f Controls → f4 Touch Controls → Touch Shooting → OFF
Or to fully disable: Menu → Custom Settings Menu → f Controls → f4 Touch Controls → Enable/Disable → Disable
🛰️ GPS Not Tagging Photos / Location Missing
GPS not enabled in menu
Enable Location Data in the Setup menu — it's off by default.
Menu → Setup Menu → Location Data → Position → Enable
No GPS signal yet — waiting for first fix
The first GPS acquisition after powering on takes 1–2 minutes in open sky. Go outdoors and wait for the GPS icon in the viewfinder to stop blinking and show steady. Turn the camera on outside while you're preparing kit so it's locked before you start shooting.
Shooting indoors or under dense tree cover
GPS signals don't penetrate buildings well. The Z9 uses the last known position for indoor shots. Use SnapBridge app location sharing as a supplement for precise indoor location data.
Airplane Mode is ON
Airplane Mode disables all wireless including GPS on the Z9.
Menu → Network Menu (antenna icon) → Airplane Mode → OFF
📺 Rear LCD Gone Blank / Menu Button Not Working
Screen blank but camera otherwise working
Check if the EVF eye sensor is triggering — placing your eye near the viewfinder switches the display to EVF only. Also check your monitor mode setting by pressing the DISP button to cycle through display modes.
Press the DISP button to cycle through monitor modes
Full lockup — screen blank and buttons unresponsive
Remove the EN-EL18d battery, wait 30 seconds, reinsert and power on. If this recurs, update to the latest Z9 firmware.
Menu → Setup Menu → Firmware Version — check current version, then download latest from downloadcenter.nikonimglib.com
🔢 Shutter Speed Showing Strange Values (e.g. 1/197, 1/83)
This is not a fault — completely normal. It's caused by High-Frequency Flicker Reduction being active, which deliberately uses non-standard shutter speed increments to find values that minimise flicker under artificial lighting. You'll see odd numbers like 1/197 instead of 1/200. Everything is working correctly. To restore standard shutter speeds, turn it off:
Menu → Photo Shooting Menu → High-Frequency Flicker Reduction → OFF
🖥️ Screen Auto-Rotating During Playback
Portrait images are rotating to show as small thumbnails when you tilt the camera during playback, making them awkward to review. Turn off auto-rotate in the Playback menu:
Menu → Playback Menu (triangle icon) → Auto-Rotate Pictures → OFF
🔋 Battery Draining Too Fast
Standby timer too long — the biggest drain
The standby timer is the single biggest battery drain. Set it to 30 seconds or 1 minute for maximum conservation. The EN-EL18d is a large battery, but unnecessary screen time wastes it fast.
Menu → Custom Settings Menu → c Timers/AE Lock → c3 Power Off Delay → Standby Timer → 30s or 1 min
Turn off picture review
Disabling the image preview after each shot saves significant battery during burst shoots — the screen lights up after every single frame otherwise.
Menu → Playback Menu (triangle icon) → Picture Review → OFF
Disable wireless when not needed
GPS, Bluetooth, and Wi-Fi all draw power. The EN-EL18d handles this well, but if you're pushing battery life on a long day, airplane mode helps.
Menu → Network Menu → Airplane Mode → ON
Reduce monitor brightness
Menu → Setup Menu → Monitor Brightness → lower the value
🌡️ Overheating During Video
The Z9 is significantly better than the Z8 at sustained video recording — up to 125 minutes at standard settings. However in very hot conditions or sustained 8K RAW, the card choice has the biggest impact after ambient temperature.
✅ Best Cards for Running Cool
From testing, the Pergear Gen 4.0 and ProGrade Gold Gen 4.0 run significantly cooler than cheaper cards. Cheap cards run much hotter and are often the primary heat source inside the camera. See the Heat Management section in Advanced for full tips.
Additional cooling tips
• Keep the rear LCD screen away from the body — it adds heat
• Swap cards periodically — cards absorb and store heat
• Attach a camera cage — helps dissipate heat from the body
• Use fast, efficient CFexpress cards — biggest single difference
• Swap cards periodically — cards absorb and store heat
• Attach a camera cage — helps dissipate heat from the body
• Use fast, efficient CFexpress cards — biggest single difference
📊 Noisy / Grainy Photos
ISO too high
Lower ISOs give cleaner results. The Z9 handles ISO 6400 very well but noise increases beyond that. Keep ISO as low as shutter speed and aperture allow. Everyone has a different tolerance — experiment to find your personal limit. I'm happy to 1600, with 3200 being slightly noisy for critical work.
Auto ISO maximum set too high
Set a reasonable ceiling you're comfortable with — test at home first to find your personal limit. See the Auto ISO section in Settings.
Menu → Photo Shooting Menu → ISO Sensitivity Settings → Auto ISO → Maximum Sensitivity
Underexposed then brightened in post
Pulling up underexposed shadows in editing adds significant noise. Always expose as correctly as possible in camera — slightly overexposed RAW files are far cleaner than brightened underexposed ones. At ISO 64 the Z9's dynamic range is extraordinary.
High ISO noise reduction disabled for JPEG
For JPEG shooting, enable in-camera noise reduction. RAW files need to be processed in Lightroom, Luminar Neo, or similar software.
Menu → Photo Shooting Menu → High ISO NR → Normal or High
🎨 Colours Look Wrong / White Balance Issues
Wrong white balance preset selected
Use Auto White Balance for most situations — it's very reliable on the Z9 in most lighting conditions.
Hold WB button → rotate rear dial → Auto
Mixed lighting confusing the camera
In mixed lighting (tungsten + daylight, for example) Auto WB can struggle. Set a specific preset or use Kelvin to lock a value manually. See the White Balance section in Settings.
Hold WB button → rotate rear dial → select Incandescent, Fluorescent, Daylight etc.
Picture Control too flat or desaturated
If colours look dull, switch from Flat or Neutral to Standard or Vivid for more saturated JPEG results. For RAW shooters this only affects the preview.
Menu → Photo Shooting Menu → Set Picture Control → Standard or Vivid
⚡ Flash Won't Fire
Flash mode set to Off
Check the flash mode is not accidentally set to Off in the menu.
Menu → Photo Shooting Menu → Flash Control → Flash Control Mode → TTL or Manual
Flash not fully seated in the hot shoe
Remove and reattach the flash — ensure it clicks firmly into the hot shoe and the locking collar is tightened.
Flash in standby / sleep mode
Half-press the shutter button to wake the flash from standby. Always wait for the ready light before shooting.
Shutter speed too fast without HSS
The Z9's flash sync speed is 1/200s without HSS. Going faster causes banding or no flash output. Enable HSS (Auto FP) for speeds above 1/200s, or use an ND filter to keep the shutter within sync speed.
Menu → Custom Settings Menu → e Bracketing/Flash → e1 Flash Sync Speed → 1/200s (Auto FP)
Silent Mode is ON
Silent Mode suppresses flash firing entirely.
Menu → Setup Menu → Silent Mode → OFF
Hot shoe contacts dirty
Clean the hot shoe contacts on both the camera and flash with a dry cloth.
📉 JPEG Images Look Flat or Not Sharp
Picture Control set to Flat or Neutral
Switch to Standard or Vivid for more contrast and saturation straight out of camera.
Menu → Photo Shooting Menu → Set Picture Control → Standard or Vivid
Sharpening too low in Picture Control
Increase the sharpening value within your chosen Picture Control for crisper JPEGs.
Menu → Photo Shooting Menu → Set Picture Control → select your control → Sharpening → increase to +3 or higher
Active D-Lighting reducing contrast
ADL lifts shadows and reduces highlights which can make images look flat. Lower the strength or disable it for punchier results.
Menu → Photo Shooting Menu → Active D-Lighting → Off or Low
📸 Can't Shoot Burst / Camera Only Takes One Shot
Release mode set to single shot
The most common cause — the drive mode is set to Single. Hold the Burst Mode button and rotate the rear dial to select CL or CH continuous mode.
Hold Burst Mode button → rotate rear dial → CL or CH
Buffer full / card too slow
The buffer fills and the camera pauses while writing to the card. Use a faster Gen 4.0 CFexpress card or switch to HEIF/JPEG for longer sustained bursts.
Battery low
Burst frame rates can reduce when the battery is very low. Charge or swap the EN-EL18d.
Self-timer accidentally enabled
Check the self-timer is not active — it fires only one shot per press with a delay.
Hold Burst Mode button → check no timer icon is showing → select Single or Continuous mode
🔘 Back Button Focus Not Working
BBF not configured in menu
Back Button Focus requires a menu change — it doesn't work out of the box. This is the most common reason.
Menu → Custom Settings Menu (pencil icon) → a Autofocus → a6 AF Activation → AF-ON Only
AF-ON button has been reassigned
Check the AF-ON button function hasn't been accidentally changed to something else.
Menu → Custom Settings Menu → f Controls → f2 Custom Controls (Shooting) → AF-ON Button → AF-ON
Pressing the wrong button
The AF-ON button is on the back of the camera to the upper right of the viewfinder. The portrait AF-ON button is on the vertical grip section. Make sure you're pressing the correct one for your shooting orientation.
👁️ Viewfinder Is Blurry / Can't See Clearly
Diopter adjustment incorrect
The most common cause. The diopter wheel next to the viewfinder adjusts the EVF focus for your eyesight. Look through the viewfinder and rotate the small diopter dial until the display text and icons are sharp. This is individual to each person and is one of the very first things to set up on a new camera.
Focus peaking overlay making it hard to see
Focus peaking highlights can make the viewfinder look cluttered or confusing. Disable it if you're finding it distracting.
Menu → Custom Settings Menu → a Autofocus → a13 Focus Peaking → Focus Peaking Display → OFF
EVF brightness too low or too high
If the viewfinder looks washed out or too dark, adjust the EVF brightness.
Menu → Setup Menu → Viewfinder Brightness → adjust as needed
🎯 Focus Hunts / Won't Lock On Subject
AF area mode too large
Auto Area gives the camera too many options and it can focus on the wrong thing. Switch to Wide Area (L) or Single Point for more control. Use the Cycle AF button to switch modes quickly without going into menus.
Hold Focus Mode button → rotate front dial → select Wide Area (L) or Single Point
Low contrast scene
AF struggles on very flat, low-contrast surfaces like plain walls or overcast skies. Move the focus point to a higher-contrast edge on your subject. Even a slight texture difference helps enormously.
Subject too close — below minimum focus distance
Every lens has a minimum focus distance (typically 0.3–0.5m). If you're too close the camera physically cannot focus. Step back slightly.
Low light indoors — enable AF assist illuminator
In dark conditions, enabling the AF assist illuminator helps the camera acquire focus on people and objects. Works in AF-S mode within the illuminator's range.
Menu → Custom Settings Menu → a Autofocus → a12 Built-in AF-Assist Illuminator → ON
Subject detection locking onto wrong subject
Switch to a smaller AF area mode and place the focus point deliberately on your subject, or turn off subject detection entirely.
Menu → Photo Shooting Menu → AF Subject Detection Options → OFF
💾 Memory Card Error / Can't Save Images
Card not formatted in camera
Always format cards in camera, not on a computer. In-camera formatting ensures correct compatibility with the Z9.
Menu → Setup Menu (wrench icon) → Format Memory Card → select slot → OK
Card too slow for the shooting mode
For 8K video, C120 burst, or sustained C30 RAW you need a fast Gen 4.0 CFexpress Type B card. Older or cheaper cards cause buffer overflow and card errors.
Card contacts dirty
Clean the gold contacts on the card with isopropyl alcohol and a lint-free cloth. Let dry completely before reinserting.
Card corrupted
Back up images first, then format in camera. If the error persists after formatting, the card needs replacing.
Menu → Setup Menu (wrench icon) → Format Memory Card → OK
❄️ Camera Freezes / Becomes Unresponsive
Battery reset — fixes most temporary freezes
Remove the EN-EL18d battery, wait 30 seconds, reinsert and power on.
Memory card issue
Try a different card, or format the current one in camera after backing up images.
Menu → Setup Menu (wrench icon) → Format Memory Card → OK
Firmware bug
Make sure you're on the latest Z9 firmware. Nikon has released multiple updates addressing stability. Check and update at downloadcenter.nikonimglib.com.
Menu → Setup Menu → Firmware Version → check current version
Overheating
The camera may freeze or shut down during sustained 8K RAW in hot weather. Power off, remove cards and battery, and let it cool before retrying.
Factory reset as last resort
Save your settings to card first, then perform the reset. Reload your saved settings afterwards and you're back to your full configuration instantly.
Save first: Menu → Setup Menu → Save/Load Settings → Save Settings
Then reset: Menu → Setup Menu → Reset All Settings → Yes
⏱️ Why Is My Camera Taking Twice As Long for Long Exposures?
If your camera sits doing nothing after a long exposure — taking just as long again before showing you the image — this is Long Exposure Noise Reduction at work.
Here's what's happening: during a long exposure the sensor heats up slightly, causing certain pixels to glow randomly — called hot pixels. Long Exposure NR fixes this by immediately taking a second "dark frame" exposure of the same length, with the shutter closed, and using it to map and subtract those hot pixels from your image.
The result is a cleaner image — but the trade-off is it doubles your time between shots. A 30-second exposure takes 30 seconds to shoot and another 30 seconds to process, meaning you can only take one shot every minute.
✅ When to Turn It Off
For timelapse shooting, always turn LENR off — it will completely ruin your interval timing. For astrophotography where you're taking many shots to stack, turn it off and handle noise reduction in software (Lightroom, Sequator, or DeepSkyStacker handle this far better). For occasional single long exposures, leaving it on is fine.
Menu → Photo Shooting Menu → Long Exposure NR → OFF
Recommended Gear for Z9 Shooters
Accessories that make a real difference based on real-world Z9 use.
💾 Memory Cards
Delkin Black CFexpress Type B — Top Choice
The go-to recommendation for Z9 shooters. Reliable, fast, handles 8K RAW and C30 bursts without issue. Available in 128GB, 256GB, 512GB, 1TB.
ProGrade Gold CFexpress Gen 4.0
Excellent Gen 4.0 performance at a competitive price. Strong alternative to Delkin for 8K and high-speed burst work.
Pergear CFexpress Type B
Budget-friendly option that performs well for most Z9 workflows. Good value for a second slot backup card.
🔋 Batteries & Power
EN-EL18d — Official Spare Battery
The Z9 uses the EN-EL18d. Despite the 2,100 shot CIPA rating, for professional all-day shoots (weddings, sports tournaments), always carry at least one spare. Third-party options exist but official Nikon batteries are safest.
MH-33 Charger
The official Nikon charger for the EN-EL18d. Charges in approximately 2.5 hours. Essential for multi-battery rotation on long shoots.
USB-C PD Charging Cable
A high-quality USB-C PD cable allows in-camera charging and continuous power supply from a mains adapter. Excellent for long studio sessions or timelapse work where swapping batteries is impractical.
🎒 Recommended Accessories
L-Bracket for Z9
An L-bracket attaches to the base and side of the Z9 for quick portrait/landscape orientation switching on a tripod without re-balancing. Essential for serious tripod users. The Z9's integrated grip body means you need a Z9-specific bracket.
Eyecup Replacement (Nikon DK-33)
The Z9 ships with the DK-33 eyecup. A replacement or aftermarket rubber eyecup is worth keeping as a spare — they get lost or worn over time.
CFexpress Type B Card Reader
A USB 3.2 Gen 2 or Thunderbolt CFexpress reader is essential for transferring 8K RAW files at full speed. A slow card reader is a workflow bottleneck. The Angelbird, Delkin, and ProGrade readers are all excellent choices.
🔭 Recommended Z-Mount Lenses
The Z9 is a full-frame FX camera and works with all Nikon Z-mount lenses natively, and F-mount lenses via the FTZ II adapter. After years of shooting with the Z series, these are the lenses I personally use and recommend.
🤳 Portrait
🏔️ Landscape
🦅 Wildlife & Sports
🔭 Teleconverters
🔬 Macro
🏙️ Street & Travel
🎬 Video
📷 General Purpose
💰 Budget
⭐ Premium
🤳 Portrait Photography
A superb environmental portrait lens — the f/2.8 aperture gives beautiful background separation at the longer end and the versatile zoom range means you never have to change lens during a session.
Versatile, lightweight, excellent for environmental portraits. One of the best value lenses in the entire Z lineup.
Sharp, affordable, beautiful bokeh. Perfect for headshots and portraits. A great starting portrait lens that punches well above its price.
Incredible subject isolation, creamy bokeh, and tack-sharp at f/1.2. Professional portrait photographers' dream lens.
Fantastic portrait lens with beautiful compression and subject separation. Doubles as a professional macro lens — two lenses in one.
The ultimate portrait lens. Incredible bokeh rendering unlike any other lens in the range. Premium option but the results speak for themselves.
Excellent for portraits — the longer focal lengths compress backgrounds beautifully and the f/2.8 aperture creates stunning subject separation. Great for keeping distance from your subject while still filling the frame.
🏔️ Landscape Photography
Compact ultra-wide, great for dramatic landscapes. Takes standard 82mm screw-in ND filters — a huge advantage for long exposure work.
Professional ultra-wide with stunning edge-to-edge sharpness. The f/2.8 aperture also makes it excellent for astrophotography.
Outstanding wide prime for landscapes and astrophotography. Exceptional corner sharpness and very low coma on stars — the go-to Z-mount astro lens.
Versatile workhorse for landscape work — the constant f/2.8 aperture is ideal for low-light situations at dawn or dusk, and the zoom range covers most landscape scenarios in one lens.
Lightweight, excellent all-around landscape lens. Great companion to the 14-30mm when you want to extend your range without a heavy bag.
Extended range for versatility in the field. Covers wide to short telephoto — one lens for a full day of landscape shooting.
A great telephoto option for landscape photography — ideal for compressing distant mountains, isolating a subject within a scene, or pulling in detail from a far shoreline.
🦅 Wildlife & Sports Photography
Professional telephoto zoom. Incredible for sports, indoor events, and portraits. The f/2.8 and outstanding VR make this a workhorse lens.
The upgraded second generation — same versatile range with improved sharpness, VR, and AF performance over the original.
Versatile telephoto, excellent reach and sharpness. Lighter and more compact than the 180-600mm while maintaining professional image quality.
Best value telephoto zoom — incredible reach at 600mm. Hugely popular with wildlife and bird photographers. Outstanding value paired with the Z9.
The ultimate wildlife and sports lens. Built-in 1.4× teleconverter, extraordinary AF performance. The flagship Z telephoto prime.
Lightweight prime, perfect for wildlife and birds. Surprisingly compact for a 400mm and delivers outstanding sharpness wide open.
Compact super-telephoto, great for distant subjects. A relatively portable 600mm that opens up incredible opportunities for bird photography.
Maximum reach in a relatively compact package. For serious birders and wildlife photographers who need every millimetre. Pairs with Z9 DX crop for effective 1200mm.
Nikon's flagship mirrorless supertelephoto. The built-in 1.4× TC flips it to 840mm f/5.6 instantly — a feature unique to Nikon that Sony and Canon can't match on equivalent lenses. Add the external TC-2.0x for 1,200mm, or combine both for an extraordinary 1,680mm. The definitive professional wildlife and sports supertelephoto.
🔭 Teleconverters
The Nikon Z TC-1.4x and TC-2.0x mount between the camera body and lens to extend your reach without changing lenses. They are fully electronic — autofocus, VR, and EXIF data all work normally. Not all lenses are compatible so always check before buying.
1.4× magnification with just 1 stop of light loss. The best all-round choice — full autofocus maintained and minimal image quality impact on S-line lenses.
2× magnification with 2 stops of light loss. Best used in good daylight. AF still works on the Z9 even at f/8–f/9 apertures thanks to the phase-detect system.
Compatible lenses — both TCs
Z 70-200mm f/2.8 VR S · Z 100-400mm f/4.5-5.6 VR S · Z 180-600mm f/5.6-6.3 VR · Z 400mm f/4.5 VR S · Z 400mm f/2.8 TC VR S · Z 600mm f/4 TC VR S · Z 600mm f/6.3 VR S · Z 800mm f/6.3 VR S
Popular TC-1.4x combos:
70-200 f/2.8 = 280mm f/4 | 100-400 = 140-560mm f/6.3 | 180-600 = 252-840mm f/8 | 400mm f/4.5 = 560mm f/6.3 | 600mm f/6.3 = 840mm f/9 | 800mm f/6.3 = 1120mm f/9
Popular TC-2.0x combos:
70-200 f/2.8 = 140-400mm f/5.6 | 100-400 = 200-800mm f/9 | 400mm f/4.5 = 800mm f/9 | 600mm f/6.3 = 1200mm f/13
🔬 Macro Photography
Affordable, compact macro, great for product photography and close-up work. An excellent and budget-friendly entry point into macro photography.
🏙️ Street & Travel Photography
Outstanding wide prime for astrophotography and low-light landscapes. Also works beautifully as an environmental wide-angle for travel and street photography.
Versatile zoom that covers most situations on the road. Lightweight enough for all-day travel without fatigue.
One-lens solution for travel. Covers wide to short telephoto so you can leave everything else at home.
Tiny, lightweight, perfect walkaround lens. Barely adds any weight or bulk and produces excellent results at a very affordable price.
Versatile wide prime perfect for street photography and environmental portraits. Compact, sharp, and very capable in low light.
🎬 Video & Filmmaking
Cinematic wide-angle shots with stunning sharpness. The go-to lens for establishing shots and dramatic scenery.
Constant aperture, smooth focus, professional standard. The go-to lens for professional video and hybrid shooters on the Z9.
📷 General Purpose "Do Everything" Lenses
Best all-arounder — covers wide to short telephoto in one compact lens. The lens I'd recommend to most Z9 owners as their everyday lens.
Lighter alternative with excellent optics. A great choice if you want something more compact but still very versatile.
💰 Budget-Friendly Starter Lenses
Most affordable wide-angle zoom option. Compact and takes standard ND filters — great value for landscape shooters.
Affordable and sharp — great for learning. One of the cheapest lenses in the Z range but delivers excellent image quality.
Cheap, tiny, excellent image quality. The ideal second lens if you want a compact prime without spending much.
Professional standard zoom. The definitive do-everything professional lens — events, weddings, documentary, video.
Professional 50mm with stunning bokeh and low-light performance. The f/1.2 creates magical subject separation and beautiful background blur.
Manual focus only, extreme low-light capability. A very special lens for specific use — astrophotography, ultra-low light, or simply the most stunning available-light portraits imaginable.
Professional telephoto zoom — arguably the sharpest 70-200mm ever made. Outstanding VR, build quality, and performance in all conditions.
The upgraded second generation of this flagship telephoto. Further refined optics, improved VR, and enhanced AF — the definitive professional 70-200mm.
The premium portrait prime. Stunning bokeh, incredible sharpness, and a build quality that justifies every penny.
Ultimate portrait lens with bokeh rendering unlike anything else in the Nikon lineup. If you shoot portraits professionally this lens will blow your clients away.
The ultimate wildlife and sports lens. Built-in 1.4× teleconverter, extraordinary AF performance. The flagship Nikon Z telephoto prime.
Nikon's flagship mirrorless supertelephoto at ~£12,000. Built-in 1.4× TC converts it to 840mm f/5.6 at the flick of a switch — unique to Nikon. Combined with the external TC-2.0x it reaches 1,200mm; use both TCs together for 1,680mm. Aimed squarely at top-tier sports and wildlife professionals who need maximum reach with uncompromised AF.
💡 FTZ II Adapter for F-Mount Lenses
The Nikon FTZ II adapter lets you use all your existing Nikkor F-mount lenses on the Z9 with full AF and VR functionality (for AF-S and AF-P lenses). Performance is excellent — the Z9 is immediately compatible with your existing lens collection at no quality penalty.
💻 Recommended Photography Software
The Z9's RAW files and high-resolution output need good software to get the most from them. Professional editing software options including a few discount codes!
Adobe Lightroom — Photo Organisation & RAW Editing
The industry standard for organising and processing Z9 RAW files. Excellent NEF support, powerful cataloguing, non-destructive editing, batch processing, presets, and seamless integration with Photoshop. Available as part of Adobe Creative Cloud Photography plan (includes Photoshop).
Adobe Photoshop — Professional Image Editing
The professional standard for advanced image editing and manipulation. Layers, advanced masking, compositing, retouching, and focus stacking via Auto-Blend Layers. Included in Adobe Creative Cloud Photography plan with Lightroom.
Luminar Neo — AI-Powered Photo Editor
💰 Use code at checkout for 10% off all year round:
HAYES10
AI-powered photo editor that makes complex edits simple. AI sky replacement, portrait retouching, intelligent object removal, advanced masking, and professional colour grading. Perfect for photographers who want powerful results without a steep learning curve. The Focus Stacking extension is brilliant for Z9 macro work!
ON1 Photo Raw 2026 — Complete Photography Suite
💰 Use code at checkout for 20% off:
HAYES20
A full photography editor and digital asset management system combining powerful RAW processing, layers-based editing, AI tools, local adjustments, effects, and complete photo organisation — all in one application. A comprehensive Lightroom and Photoshop alternative with no subscription required.
Capture One — Professional Colour & RAW Processing
Professional alternative to Lightroom with superb colour science. Many commercial photographers prefer it for skin tones and colour accuracy. More control over individual colour channels than Lightroom. Excellent Z9 NEF RAW support.
Nikon NX Studio (Free)
Nikon's own free RAW processor. Essential for Pixel Shift merging — the only software that correctly merges Z9 Pixel Shift files. Also handles NEF RAW with full Picture Control support.
💡 For RAW File Compatibility
If your existing Lightroom or software version doesn't recognise Z9 NEF files, either update to the latest version or use Adobe's free DNG Converter to convert files to the universal DNG format which any version supports.
👕 Photography Apparel & Merch
Check out my exclusive photography t-shirts designed for photographers by a photographer.
Shoot First Ask Questions Later

Shutter Therapy In Progress
Photography T-Shirts
Premium quality t-shirts perfect for photoshoots, trips, camera club events or as gifts for fellow photographers.
🛒 Shop the Collection
Your support helps create more free video tutorials on YouTube and these photography guides. Thank you! 🙏
📖 Full Menu Reference
Every setting in every Z9 menu, with the exact path to find it and a plain-English description of what it does. Tap a menu group to jump straight there.